
How to Set Up Custom Channel Groupings in Google Analytics and Why It Matters
Do you know what Google Analytics (GA) Channel Groupings are? Do you understand the difference between Default Channel Groupings and Custom Channel Groupings? And do you know how to group channels together?
In this post, I answer these questions so that you can start using Custom Channel Groupings to highlight and aggregate traffic channels together in GA.
The ABC (Acquisition, Behaviour, and Conversion) reports were introduced in 2013 and with these came the Channels report. The Channels report allows you to group traffic sources together; it is the first logical step for segmenting your data and gaining a better understanding of ROI.
Acquisition report changes
Before we start looking at channel groupings, you may have noticed a few changes in the Acquisition reports in GA last month.
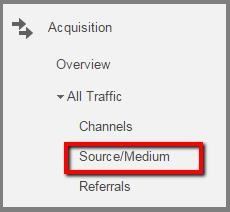
Where did the All Traffic report go?
Don’t worry - it hasn’t disappeared, it just has a new name! It is now called ‘Source/Medium’:
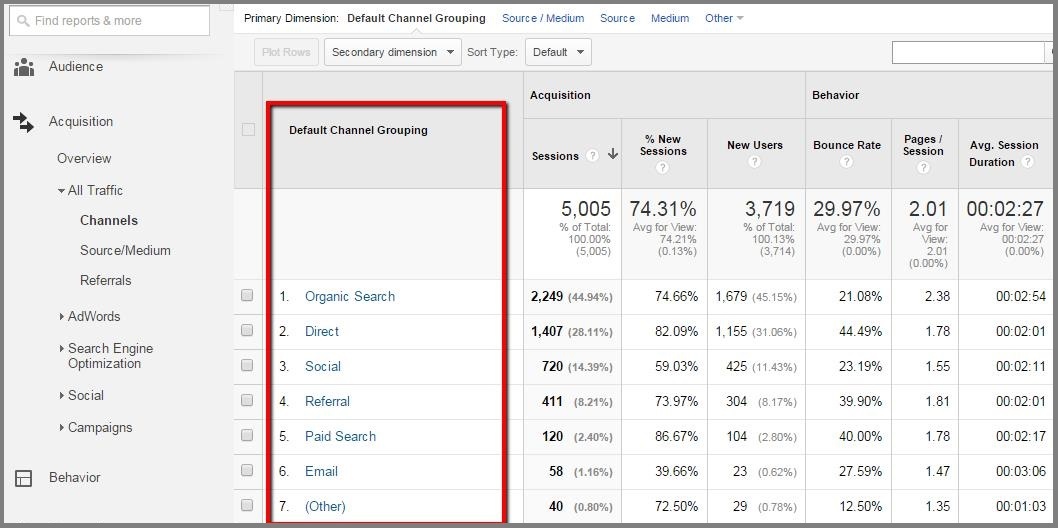
However, this change could mean that you now look at the Channels report for your data. Yet, when you open the Channels report, you can see the Default Channel Grouping appears as the primary dimension:
What does this mean for you?
By default this has eight predefined channel groupings:
1. Organic search
2. Direct
3. Social
4. Referral
5. Paid Search
6. Display
7. Email
8. Other Advertising
‘Other Advertising’ typically consists of everything that doesn’t fall into any other category – usually poorly tagged campaigns.
For more information on each of these predefined channel groupings, see Google’s default definitions.
Note that the Default Channel Grouping report is unlikely to show you traffic in the same way that you would expect to see if you have been using campaign tagging – and we all know the importance of campaign tagging, don’t we? Campaign tagging is essential if you want to report on the success of your digital campaigns.
For more info on campaign tagging see our blog post or download our campaign tagging cheat sheet.
Top tip If you attempt to compare data from the Default Channel Groupings report with the Source/Medium report, there is likely to be inconsistencies. This in turn could lead to inaccurate insights being drawn because of the way that Google defines the channel groups.
If you use campaign tagging parameters for your campaigns, this could also cause discrepancies between the two reports if your campaign parameters do not match the system-defined channels.
The example below shows the Default Channel Grouping report on the left and the Medium report on the right – both taken from the same GA profile and covering the same date range:
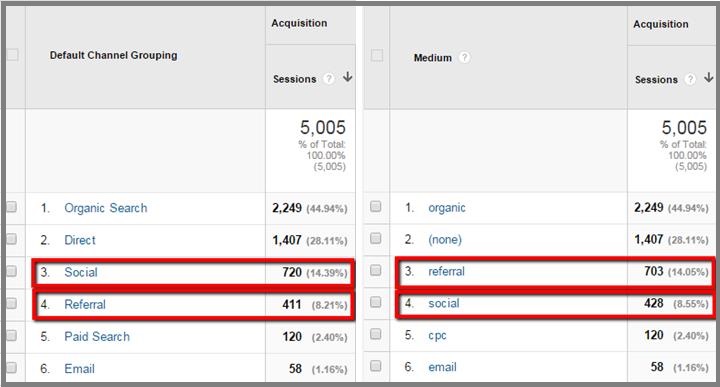
Left: Default Channel Grouping report. Right: Source/Medium report
As you can see, there are discrepancies between the amounts of social and referral traffic being recorded across the two reports.
Default Channel Groupings and Custom Channel Groupings
What is the difference between Default and Custom Channel Groupings, and why do you need to use them?
The Channels report can display the Default Channel Grouping or a Custom Channel Grouping:
- Default Channel Groupings – Groups traffic based on predefined rules for source and medium values
- Custom Channel Groupings – Channels you define using source, medium, campaign, or other data values or dimensions.
So what can you do to ensure the data you’re reporting on is correct?
To see your campaign traffic assigned as you have manually tagged it, you can use either the Channels > Medium report or the Source/Medium report. Alternatively, you can create a Custom Channel Grouping.
How do you edit or create a Channel Grouping?
The options depend on what access you have to the Analytics view you are working in, and which report you want to see the grouping in.
With edit access , you can:
- Edit the Default Channel Grouping for Acquisition reports
- Create a new Channel Grouping for the Acquisition reports
- Create a new Custom Channel Grouping for both Acquisition reports and the Multi-Channel Funnel (MCF) reports
With read & analyse access, you can:
- Create a new Custom Channel Grouping for both Acquisition reports and the MCF reports.
Top tip New and Default Channel Groupings defined in the Channel Settings section of the Admin pane are only available in the Acquisition reports. They cannot be applied to the MCF reports.
Channel Groupings for Acquisition reports
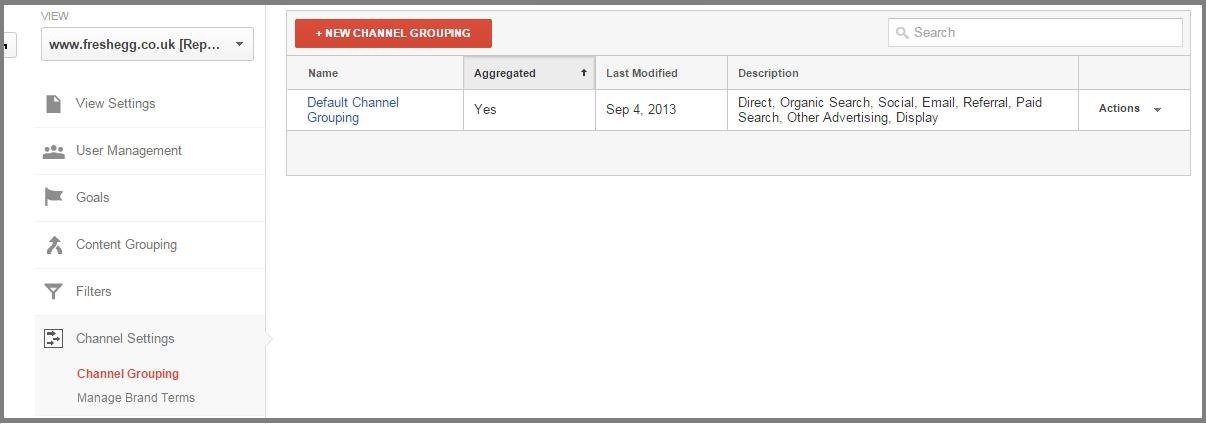
As you can see, only those users with edit access can create a new Channel Grouping or edit the Default Channel Grouping for use in the Acquisition reports only.
This is done in the Channel Settings section of the Admin area, where you can create a new Channel Grouping, or you can edit the Default Channel Grouping.
Any changes you make to the Default Channel Grouping will not be applied retrospectively. However, any new Channel Grouping that you create will be – making this a useful tool to group together historical data.
For example, if when you started using campaign tagging, some social campaigns were tagged with a medium of Twitter or Facebook instead of Social you can now apply a rule so that all social campaigns are grouped together.
How to edit the Default Channel Grouping for the Acquisition reports
To edit the Default Channel Grouping simply click on it in the above screen to open the menu below:
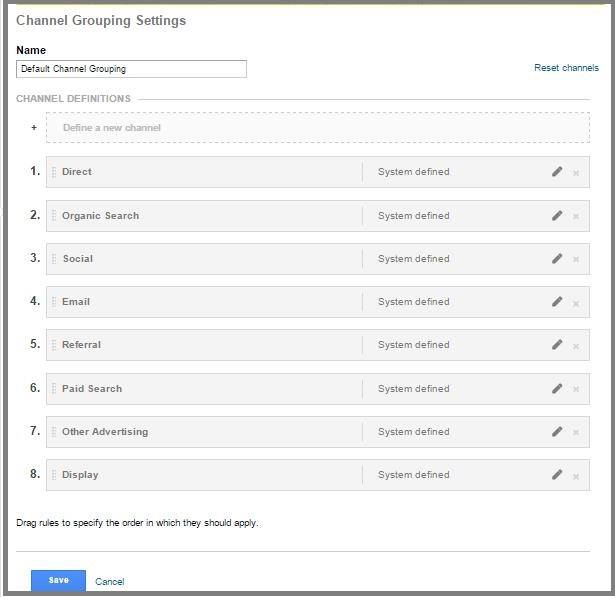
Here you can define a new channel or edit any of the existing ones.
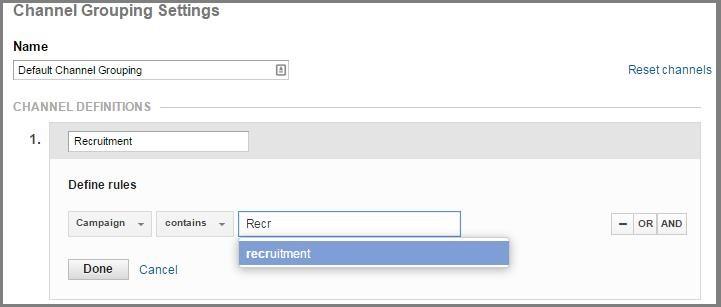
To define a new channel, you will most likely use the medium, source, and/or campaign values associated with a session. For example, here we are running a recruitment campaign through PPC, which we want to see as a separate channel from Paid Search. This is done through the use of the campaign tag:
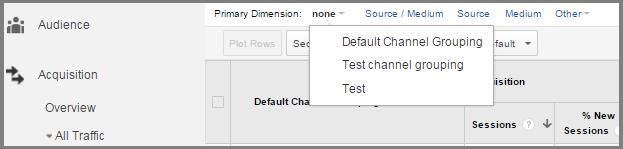
To apply a new Channel Grouping to the Acquisition reports, select it from the drop down in the primary dimension:
Top tip Any changes you make to the Default Channel Grouping will change how the data is processed from when you save your changes. As mentioned before, it will not be applied to historical data. Therefor Fresh Egg does not recommend editing the Default Channel Grouping, unless you have set up a new view to use them in.
Top tip Channels are assigned in order and each session can only match one of the channels. So channels that are more specific should be placed ahead of those that are more generic. For example, the recruitment channel we set up in the previous example should be placed above the paid search channel, to prevent recruitment ending up in the paid search grouping.
Top tip Whilst you need edit rights to be able to define Channel Groupings for the Acquisition reports, remember changes here will alter the underlying data for all users of the view in question.
Fresh Egg recommends that you try your new Channel Groupings in a test view before deploying to your reporting view.
How to create a Custom Channel Grouping
Note that the Channel Groupings discussed above can only be used in the Acquisition reports and can only be created by those users with edit access to a view.
In order to create a Custom Channel Grouping that can be used in both the Acquisition reports and the MCF reports, they need to be created in the Custom Channel Grouping section from the Admin pane.
Top tip For all users to use the same Custom Channel Groupings in both Acquisition reports and MCF reports, a user must first create the Custom Channel Grouping, and then share them with all the other users of the view.
Step 1: Create a new Custom Channel Grouping
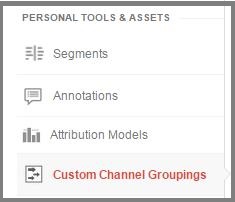
You can create a new custom channel grouping from within the Admin interface under Personal Tools & Assets:
Or, you can do this straight from the MCF reports. You have two options here:
- You can create a new Custom Channel Grouping
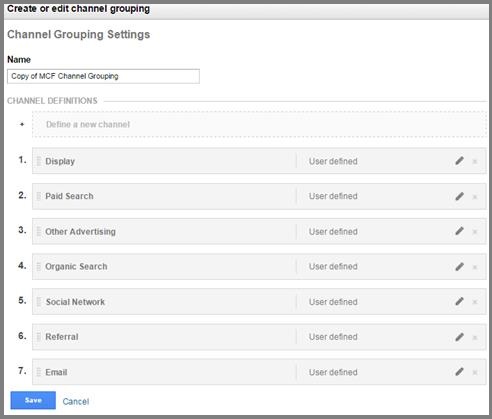
- You can copy the MCF Channel Grouping – this will allow you to use the Default Channel Grouping as a template that you can then edit

Note that you cannot edit the Default Channel Grouping for MCF reports.
Top tip The major benefit to creating a new Custom Channel Grouping here is that you can also use it in the Acquisition reports, giving you consistency across your reporting.
Step 2: Rename the Channel Grouping
Next, you should rename the Channel Grouping. You can then define a new channel and/or edit the existing channels:
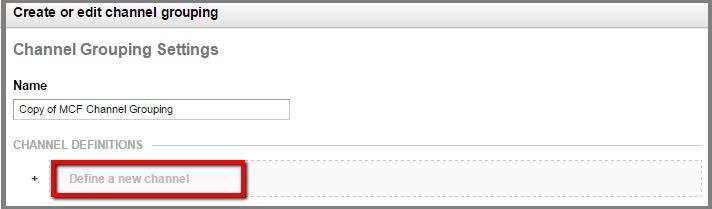
Step 3: Define a new channel
To define a new channel, simply click on the ‘Define a new channel’ button:
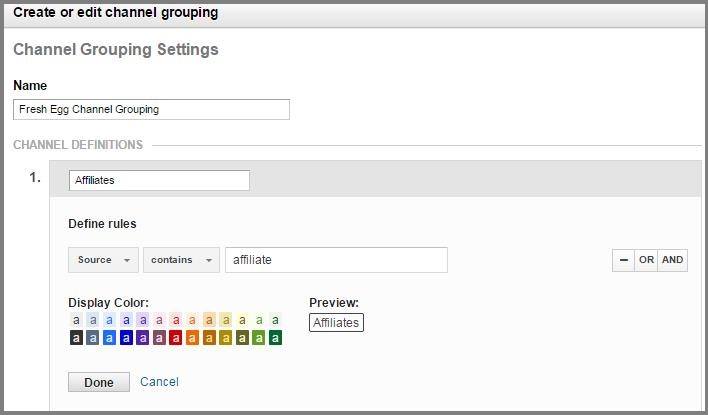
All you need to do is give the channel a name and define the rules – once you have done that, you can click ‘Done’:
Step 4: Edit existing channels
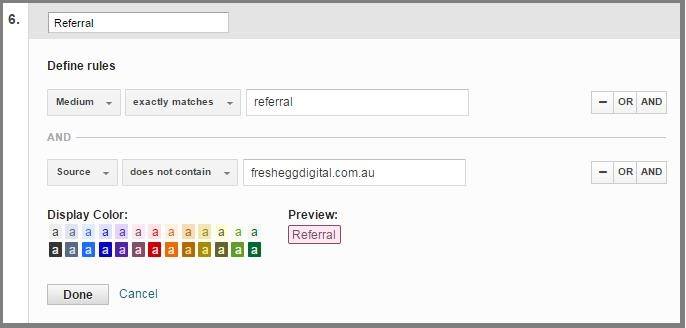
To edit an existing channel, click the channel you want to edit and amend the rules:
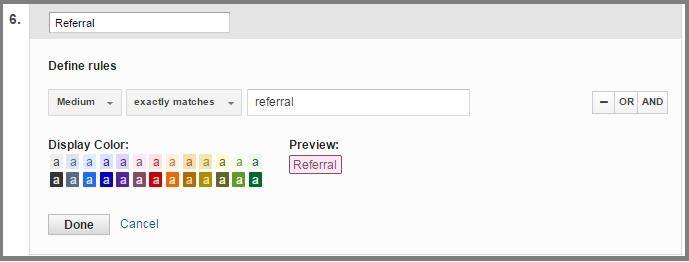
Here, a rule has been added to state that traffic from an Australian site that should not be included in referral traffic:
Step 5: Order channel rules to ensure data is captured correctly
Drag and drop the rules for each channel into the order they should apply. Each session will only be put into one of the channel buckets. Rules are applied from top to bottom, so channels that are very specific should be applied higher up than those that are more generic.
For example, if you have referrals from a specific source that you do not want to appear in the referrals bucket, create a new rule for them and apply it before the referral rule.
Step 6: Save the new Channel Grouping
Once you have made all your amends and ordered the rules to ensure data is captured to the correct channels, make sure you save your Channel Grouping.
This will now be available in the Acquisition and MCF reports.
Step 7: Share the Custom Channel Grouping
For all users of the view to be able to use the same Channel Groupings, they must be shared.
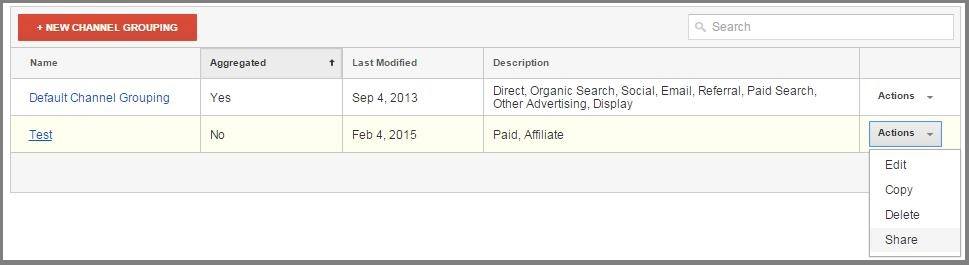
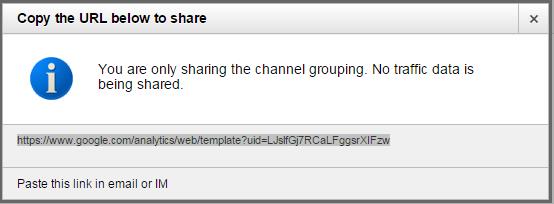
Clicking on the Share option from the Actions drop down menu will provide you with a link to send to all users:
Once shared, these Custom Channel Groupings are easy to view in both the Acquisition reports and the MCF reports by selecting the relevant grouping from the drop down in the primary dimension:

Some important things to remember about Custom Channel Groupings
- Your new Channel Groupings will not be available in custom reports and dashboards. It will only be available in the Acquisition and MCF reports
- Any user with read and analyse permissions can create their own Custom Channel Grouping for their own login
- Any changes to the Default Channel Grouping in the Acquisition reports is not retrospective.Therefore, making changes to the Default Channel Grouping is better kept for new views to avoid inconsistencies with historical data
- Changes made to the Default Channel Grouping by a user with edit access will affect the data for all users of the view from the time it is saved
Private Channel Groupings
A Private Channel Grouping feature is currently in beta in Google Analytics.
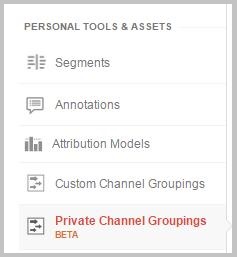
The Private Channel Grouping allows you to define Channel Groupings for personal use and then swap to access these via a drop down from the Default Channel Groupings.
This feature allows you to create multiple Private Channel Groupings and swap through these to view different segments of your data.
Top tip Despite their close proximity within the Admin section of the UI to Custom Channel Groupings, Private Channel Groupings only apply to the Acquisition reports. They allow a user with edit access to create a Channel Grouping that will appear only in the Acquisition reports and only for that user.
Top tip Private Channel Groupings allow you to test your Channel Grouping without the need for a test view.
Do you trust your Google Analytics data? Can you get all the information from GA that you need to make important decisions on advertising, conversion optimisation and content creation?
Get in touch to talk to us about the challenges you face and how we can help you to get the most out of Google Analytics.