How to stop losing your GA data
A practical guide to exporting GA to BigQuery, from setup to your first reliable dataset.
 Zac Nash
1.Introduction
GA4 doesn't hold onto raw event-level data indefinitely. The only way to keep it permanently is to export it to BigQuery, Google Cloud's data warehouse. This guide covers what you need before you start, the setup itself, the limits worth knowing, and what to do with the data once it's there.
One thing to know before you begin: the export doesn't backfill. It only starts collecting from the day you connect it, so there's no benefit to waiting, and no way to recover history from before it was switched on.
What you'll need
Admin access to your GA4 property
A Google account (a Google Workspace address if your organisation has one, otherwise any Google account works)
The ability to create a Google Cloud project and set up billing on it , either directly, or someone on your team who can do this for you
A payment card ready to add during setup (Google requires one on file to enable the export, even though most sites stay within the free tier)
Top tip!
Even if you have no intention of doing anything with this data right now, it doesn't mean it won't be invaluable in the future. This should be part of your AI ready strategy in 2026.
Quota limits
Google has enforced quota limits on the API.
Only ten concurrent request limits
Only 1.25K of token slots
GA4-360 have higher quotas
You cannot increase these limits
Additionally, GA4 has enforced quota limits, which means it is now harder to use the API for reporting. Ultimately the best solution is to use your GA4 GBQ dataset.
2.Set up your Google Cloud project and billing
Go to cloud.google.com and create a new project, or select an existing one if you already have a Google Cloud presence. Enable the BigQuery API on the project (APIs & Services > Library > BigQuery API > Enable), then add a billing account.
This step matters more than it looks. Without billing, your project defaults to the BigQuery sandbox, which has its own retention limit — data can expire after around 60 days. That defeats the entire purpose of this guide, so billing isn't optional here: it's the step that actually makes your data permanent. New Google Cloud accounts get a time-limited credit allowance, which comfortably covers setup and a good while of typical usage afterwards, and most sites doing this stay well within BigQuery's ongoing free monthly allowance too.
When naming the project, avoid anything too GA4-specific (like "GA4-project") if you might add other data sources later — CRM data or ad platform data, for example. Add at least two project owners so access isn't tied to a single person.
Top tip!
If your team has Google identities or workspace, check if you already have any organisation or billing account set up, as you can centralise management of these easily.
3.Link GA4 to BigQuery
In GA4, go to Admin > Product Links > BigQuery Links > Link, then choose the Google Cloud project you just created and confirm.
You'll then be asked to choose:
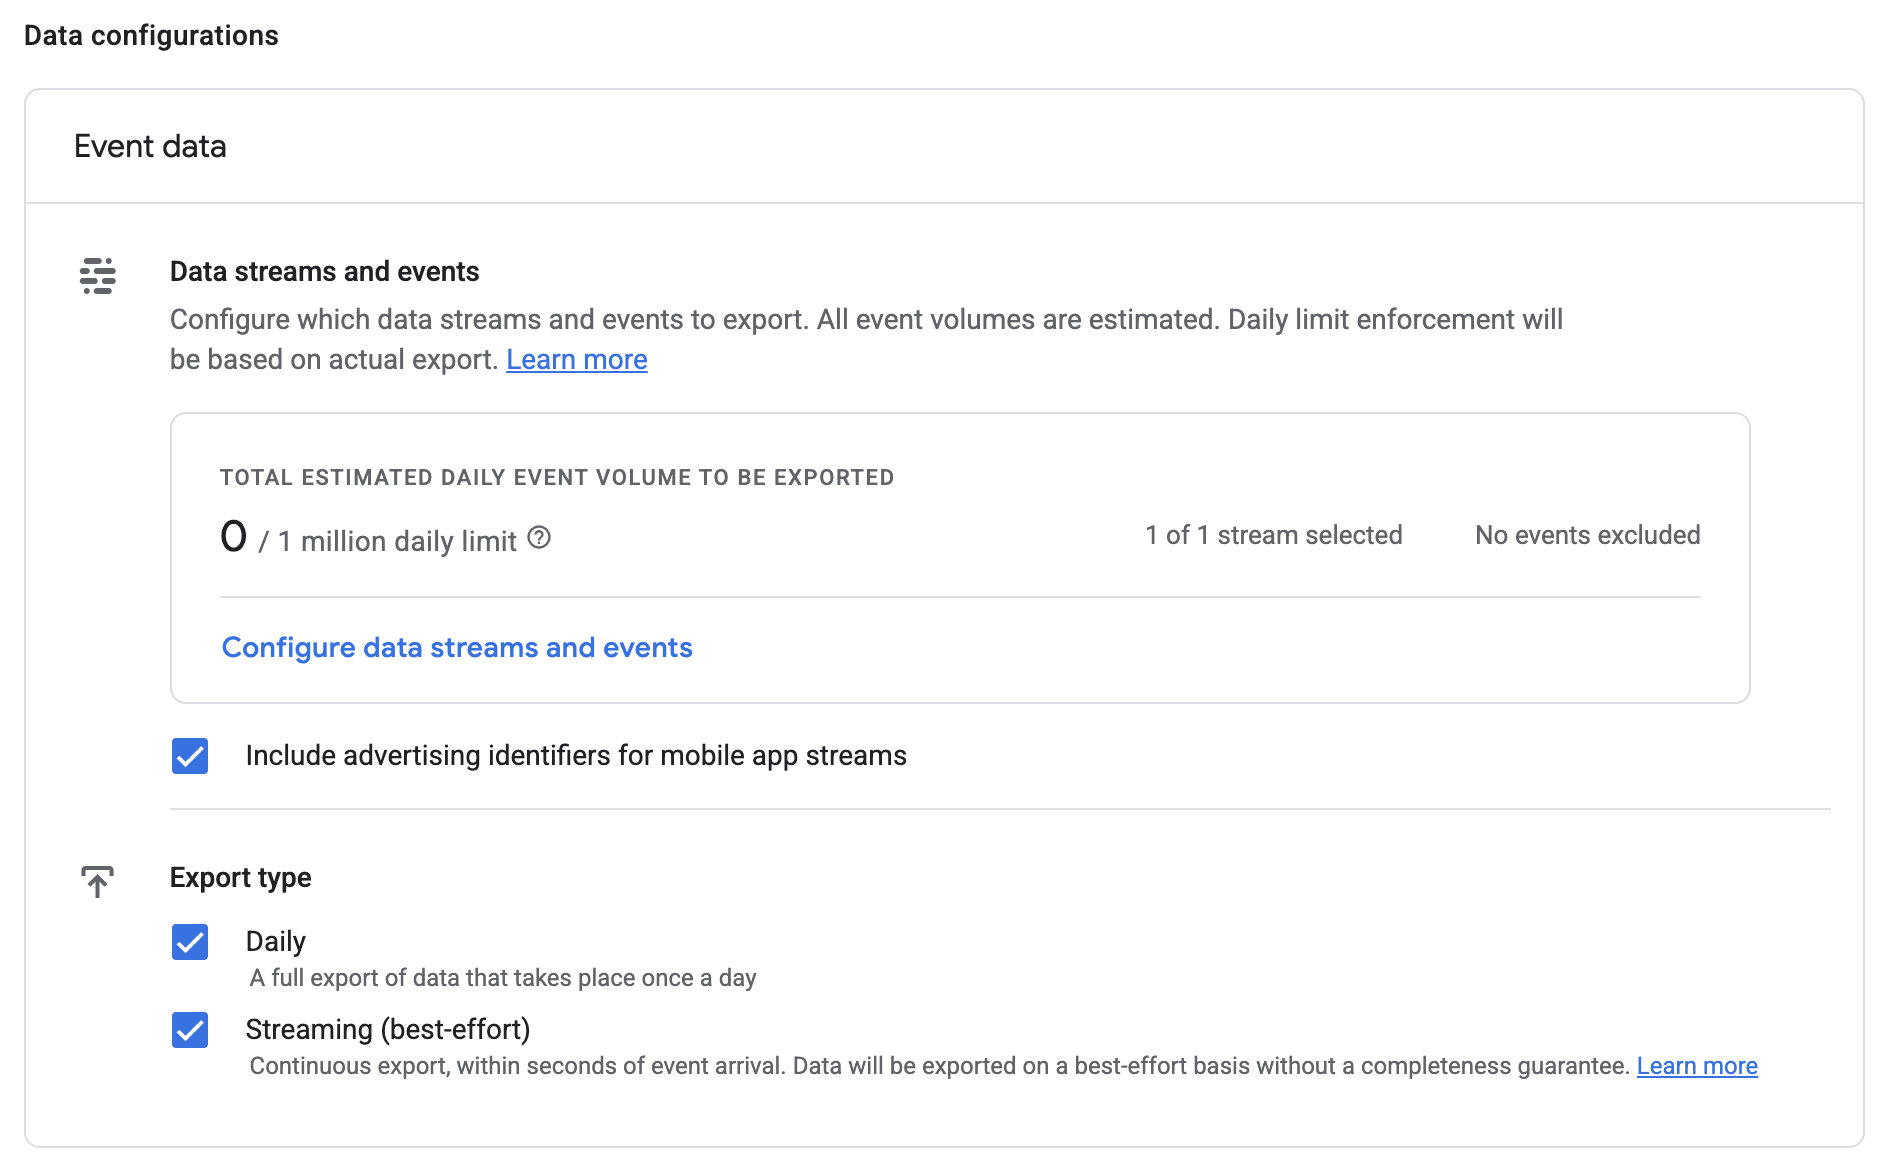
A data location. Pick carefully — this is difficult to change later without deleting and recreating the link and dataset. In practice, this usually means the region closest to your head office, both for performance and to keep the data aligned with your organisation's data residency requirements.
Which data streams and events to include, and whether to exclude any specific low-value events from the export.
Advertising identifiers, if this applies to app streams.
Export frequency — daily (batch) or streaming. Daily is the standard starting point for most sites; streaming gives you same-day data but carries its own ongoing BigQuery cost, so it's worth adding only if you have a genuine need for near-real-time data.
3.What to expect after you submit
What to expect after you submit
Data doesn't appear instantly. It can take up to 24–48 hours for the first export to land. Once it does, you should see a new dataset in your BigQuery project named analytics_<property_id> — that's your confirmation the link is working. If it's been longer than 48 hours with nothing showing, that's the point to check permissions rather than assume the setup itself is wrong.
Limits to know before you rely on this
Daily export cap. Standard GA4 properties can export up to 1 million events per day. If your site consistently exceeds that, Google can pause the daily export entirely, and missed days aren't reprocessed. High-volume sites should monitor event counts and consider excluding high-volume, low-value events from the export, or moving to streaming export.
No backfill. Worth repeating: connect it today, and today is where your history starts.
Cost is usage-based, not flat. Enabling the export itself doesn't cost anything from Google Analytics, and BigQuery gives every billing account a free monthly allowance for both storage and query processing — most small-to-medium sites sit comfortably inside it. Costs tend to creep in through query habits (scanning full historical tables instead of filtering by date range) more than through raw data volume, so it's worth building good query hygiene in from the start.
If something's not working: checking permissions
Google creates a service account automatically as part of the linking process, so this isn't something you need to set up yourself for a first-time export. If data isn't arriving after 48 hours, it's worth checking that this service account has been granted the BigQuery User role on the project — occasionally older setups end up with broader permissions than needed (Editor rather than BigQuery User), which is worth tidying up but isn't the cause of a failed export.
4.Understanding and using the exported data
GA4's BigQuery export lands as one row per event, with nested fields for things like event parameters, ecommerce data, geography, and device type. It's the same schema across every GA4 property, which makes it straightforward to join data across multiple properties if you need to. It takes some getting used to — every event parameter arrives as a nested key-value pair rather than a flat column, so pulling out a specific parameter means unnesting it in your query. Google publishes a public sample dataset with the same schema your own export will have, which is a reasonable way to get comfortable with the structure before working on live data.
Getting the export running is only the first half of the job. The raw export table is deliberately close to Google's source data, which means it inherits some real inconsistencies: several different fields can hold "traffic source" depending on scope, and consent mode can affect session continuity in ways that need accounting for before the data is trustworthy for analysis.
Connecting a BI tool like Looker Studio directly to the raw export table is a common next step, but it means every dashboard and every analyst ends up solving the same attribution and unnesting problems independently — usually slightly differently, which is how numbers stop matching between reports.
A better approach is to build (or use) a clean, maintained layer between the raw export and anything reporting from it — resolving channel attribution consistently, handling consent-mode data properly, and rebuilding incrementally rather than reprocessing full history each time. Fresh Egg's Mastertable Platform is built to do exactly this on top of the export you've just set up, so if you're planning to report from this data seriously rather than just archiving it, it's worth having that conversation before several dashboards are already built on the raw tables underneath.
6.In summary
Create a Google Cloud project, enable the BigQuery API, and add billing.
Link GA4 to BigQuery via Admin > Product Links > BigQuery Links, choosing your region, streams, and export frequency in the same flow.
Wait up to 48 hours and check for the
analytics_<property_id>dataset to confirm it's working.Monitor your daily event volume against the 1 million cap.
Once the raw data is flowing, build (or ask for) a clean layer before reporting from it seriously.
Get in touch with Fresh Egg's data engineering team if you'd like help with either the setup or the layer on top of it.