
How to tag URLs for Google Analytics campaign tracking and why you need to


As a simple definition, campaign tracking in Google Analytics (GA) allows you to consistently and effectively track the performance of your digital marketing campaigns. By using appropriate UTM parameters on your campaign URLs, you will easily be able to see how each campaign has performed against your digital marketing objectives within GA.
Campaign tracking isn’t a new thing for digital marketers. However, we’ve found that tagging consistently is not always as easy as it should be – particularly when multiple people from different teams have their own rules to follow.
That’s why we’ve created a free downloadable campaign tagging tool for you to use on your own website – to make consistent tagging as simple and quick as possible. We also offer Google Analytics and Google Tag Manager training courses to help you better utilise these platforms.
The following sections will be covered in this blog post:
1. Why is proper campaign tracking so important?
In order to start tracking your campaigns in Google Analytics, you need to set the URLs to collect data for each specific campaign.
These URLs need to be amended for all campaigns that are directing traffic to your site, for example a Facebook advert, an email marketing campaign or a banner on another site.
This could result in a long list of individual campaigns that need to be created, which means a lot of time being spent creating tracked or tagged URLs, instead of analysing the performance of your campaigns.
As already mentioned, Fresh Egg has created a spreadsheet that will create a number of URLs for you at once, saving you precious time.
The tool will then act as a campaign log that keeps details of all your previously tracked campaigns. This will ensure consistency between teams and make it easy to copy a previously created link that is stored within the tool, rather than creating the same or similar link multiple times.
There are a few advisory rules to follow when tagging up campaigns, such as consistency and correct source and medium labelling. If you don’t follow these rules, the reports in GA won’t be accurate. This, at best, means more time spent analysing campaign data, and at worst, could mean losing out on campaign data altogether.
2. An introduction to UTM parameters
A query parameter is an alphanumeric string on the end of a URL. One of the use cases may be to alter content within the page based on user input.
For example, by searching ‘campaign tagging’ on the Fresh Egg blog, the following URL is returned:
http://www.freshegg.co.uk/blog/search?q=campaign+tagging
The URL shows a query string of ‘q=campaign+tagging’ where ‘q’ is the query parameter and ‘campaign+tagging’ is the query value.
A UTM parameter is a type of query parameter placed on the end of a campaign destination URL (i.e. the page on your site that you are directing users to with your campaign). UTM parameters allow GA to extract traffic volumes and behaviour relevant to a specific campaign. For example, if you’re running a Facebook promotion and use correct UTM parameters to track that campaign, you will be able to see what that promotion has delivered, such as sessions to your site, bounce rate of the landing page, goal conversion, etc.
UTM stands for Urchin Tracking Module, which is the format used by Google to extract data from the URL. UTM parameters placed on URLs do not alter the page itself, so shouldn’t affect the way in which your users interact with your website.
The standard UTM parameters used within GA are as follows:
Source (utm_source)
Required parameter. This is used to identify the source of the campaign that is sending traffic to your site.
Example: If it’s a paid search or PPC campaign running via Google, then ‘google’ will be the source of the campaign, as it’s Google that will be sending the campaign traffic to your site.
Medium (utm_medium)
Required parameter. This is used to identify the channel that the campaign is sending traffic through.
Example: If it’s a retargeting campaign, then ‘display’ will be the marketing channel associated with the campaign.
Campaign (utm_campaign)
Required parameter. This is used to identify the specific campaign name, code or slogan that the campaign is associated with.
Example: This may refer to an email newsletter called ‘xmas_sale’ or ‘august_new_members’.
Keyword (utm_term)
Optional parameter. This is mainly used for PPC campaigns to pick up the keyword associated with the campaign.
Example: If a user comes through a PPC campaign with the keyword ‘apple crumble’ then this should be the utm_term used.
Ad Content (utm_content)
Optional parameter. This is used to distinguish different versions of a campaign.
Example: You could be testing two different versions of a remarketing campaign. Here, you could use the definitions of ‘green advert’ or ‘yellow advert’, or stick to simple naming conventions like ‘version a’, ‘version ‘b’ , ‘version c’ etc.
For each campaign that you want to track, you will need to identify the required UTM parameters and any optional parameters you might find useful in the campaign analysis. All of the following URLs have been correctly tagged with campaign tracking:
- https://www.googlemerchandisestore.com/?utm_source=google&utm_medium=cpc&utm_campaign=city – All three required UTM parameters have been assigned to the URL
- https://www.googlemerchandisestore.com/?utm_source=google&utm_medium=cpc&utm_campaign=city&utm_term=worthing – All three required parameters and one optional parameter have been assigned to the URL
- https://www.googlemerchandisestore.com/?utm_source=google&utm_medium=cpc&utm_campaign=city&utm_content=vertical – All three required parameters and one optional parameter have been assigned to the URL
💡Top tip
There are five different terms that can be assigned to a campaign to distinguish it; three of these are required.
3. Campaign tagging best practice – dos and don’ts
It is really important to tag campaigns correctly and consistently, otherwise the data collected within GA will be difficult to analyse accurately. Incorrectly tagged campaigns could also prevent campaign data from being collected at all. To ensure consistency, there are few ground rules to follow:
- Always use lowercase in your campaign parameters. Parameters are case sensitive. If you use both capitalised and lowercase versions of the same parameter (e.g. ‘Google’ and ‘google’), GA will create a separate entry for both variations. This makes it difficult to analyse the performance of your campaigns effectively. To be safe, a lowercase filter can be applied across the GA account to force all values into lowercase and therefore maintain reports with accurate data
- Be sure not to mix up the source and medium. This can really mess up GA reports and make effective campaign analysis a chore. Remember: the source is the source of traffic, e.g. ‘facebook’, while the medium is the channel, e.g. ‘social’
- If more than one person is tagging campaigns for your site, make sure everyone is following the same naming conventions. Using the campaign tagging tool as a central, working document for all involved can work well to support this
- Never use campaign tracking to track calls to action (CTAs) or promotions that are on your site, as this will override the original traffic source and inflate sessions. If someone comes through as a referral from a forum and they click on a promotion (e.g. a banner or button) on your site that’s been tagged, this will overwrite the referral with the campaign that you’ve assigned to the promotion. The original source and medium are abandoned and you lose where the user really came from. Instead, onsite promotions should be tagged as events within GA, which can be done through Google Tag Manager (GTM).
Read our blog post – How To Get Started With Google Tag Manager: Event Tracking in the New User Interface – to find out more.
Here are some examples of poor or incorrect campaign tagging we frequently encounter:
- https://www.googlemerchandisestore.com/?utm_medium=cpc&utm_campaign=city – This tagged campaign is missing the utm_source parameter, therefore no UTM parameters will be tracked in GA as utm_source, utm_medium and utm_campaign are all required
- https://www.googlemerchandisestore.com/?utm_source=cpc&utm_medium=google&utm_campaign=city – The source and medium are the wrong way round. ‘cpc’ is a medium and ‘google’ is a source. This will cause the data that is being collected to be confused and decrease efficiency when producing reports
- https://www.googlemerchandisestore.com/?utm_source=Google&utm_medium=cpc&utm_campaign=city – The term for source has been capitalised. This will separate ‘google’ and ‘Google’ in GA, even though they are the same. To reduce the risk of this error, a lowercase filter can be applied to the account for all campaign sources and mediums
💡Top tip
Make sure you always tag campaigns correctly to avoid messy reports or losing tracking of the campaign altogether.
4. How to use the Fresh Egg campaign tagging tool
To help make tagging your campaigns easier, we have created an Excel spreadsheet that adds UTM parameters to your campaign URLs. Download the resource now.
The tool can also be used for bulk tagging URLs, for example if you have different links on an email or a number of different keywords for the same campaign.
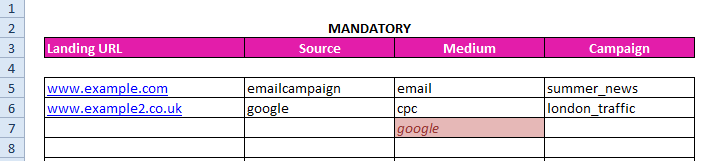
The Excel sheet contains instructions on how to input your specific campaign parameters to create a tagged URL that will be tracked in GA. All you need to do is go onto the main ‘Campaign tagging tool’ tab and enter the four mandatory fields:
- Campaign destination URL (the page that your campaign is directing users to)
- Source
- Medium
- Campaign
Using the spreadsheet:
- The final URL will turn green once the mandatory fields are all filled in. This will remain red if a mandatory parameter has not been completed, indicating that something’s not quite right
- If a common ‘source’ (e.g. ‘google’) is entered into the medium column, the cell will also turn red. This is just to point out that you may have entered the source into the incorrect column – the final URL will still be produced. This also applies to the other columns. The example below shows that a user has entered ‘google’ into the medium column. This flags up a warning, as ‘google’ should be the source of the campaign
- The ‘Keyword’ and ‘Ad Content’ columns are optional, as these are optional parameters.
- Once you’ve completed all of the relevant fields, you will be able to copy the final URL and paste it into your marketing campaign destination URL. This may be a link on an email campaign that you want to track, or the click URL of a banner that you are displaying on another site.
- Campaign tagged URLs can be quite long and ugly. Using a URL shortener, such as https://goo.gl/, allows you to shorten the URL – particularly handy for social campaigns. GA will still be able to extract the UTM parameters from the shortened URL, so there’s no need to worry about your campaigns not being tracked properly. Add the shortened URLs to the spreadsheet to save yourself even more time in the future – you will be able to easily go back and copy them if you need to use them again.
- Keep the spreadsheet as a log of your tracked campaigns to keep consistency across the team of people tagging campaigns. Users will see how other campaigns have been tagged and follow the same rules, so it is important that the first few campaigns are tagged up correctly.
- Different sheets can be used for different teams or areas within the company, or for campaigns for each quarter/year. Simply right-clicking on the original sheet tab and making a copy will produce another sheet ready for another set of campaigns to be tagged.
Testing tagged campaign URLs before going live
After creating a tagged URL, it’s important to check that your campaign tracking is working correctly.
Example: You have created a tracked URL for the Google Merchandise Store homepage (www.googlemerchandisestore.com) using the Fresh Egg campaign tagging tool.
The parameters are as follows:
- Source = newsletter
- Medium = email
- Campaign = campaign_tagging_tool
The URL would look like this: https://www.googlemerchandisestore.com/?utm_source=newsletter&utm_medium=email&utm_campaign=campaign_tagging_tool
There are two recommended ways to check that a URL has been tagged correctly, these are:


How to conduct a Google Analytics health check
Download your FREE template, then use our step-by-step guide and use in tandem to complete the health check
5. How to test tagged campaigns using Google Analytics
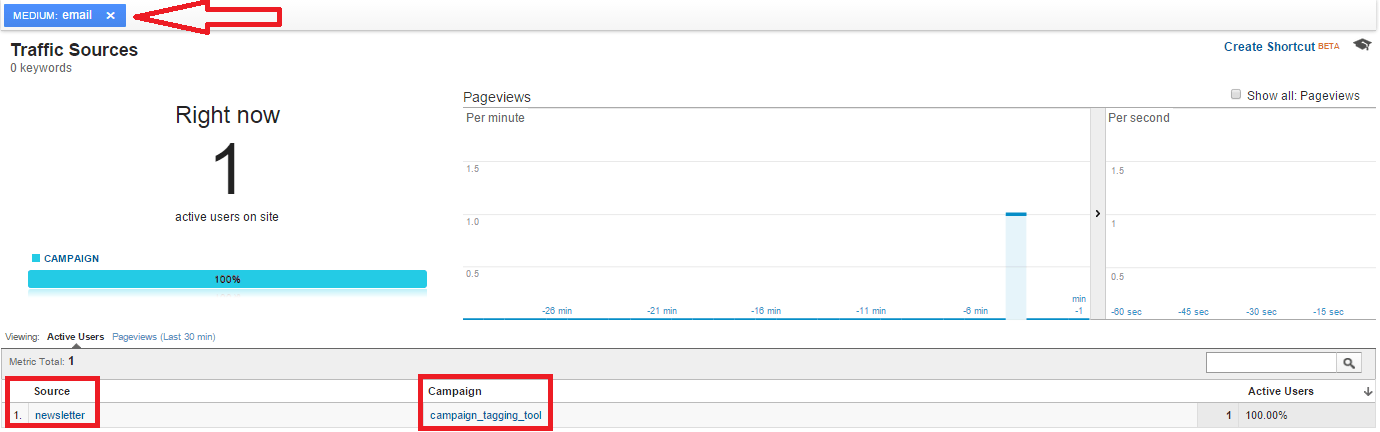
Using a GA view that includes your internal traffic (a backup view that contains no filters) is an easy way to check if you have tagged up a URL correctly with campaign parameters.
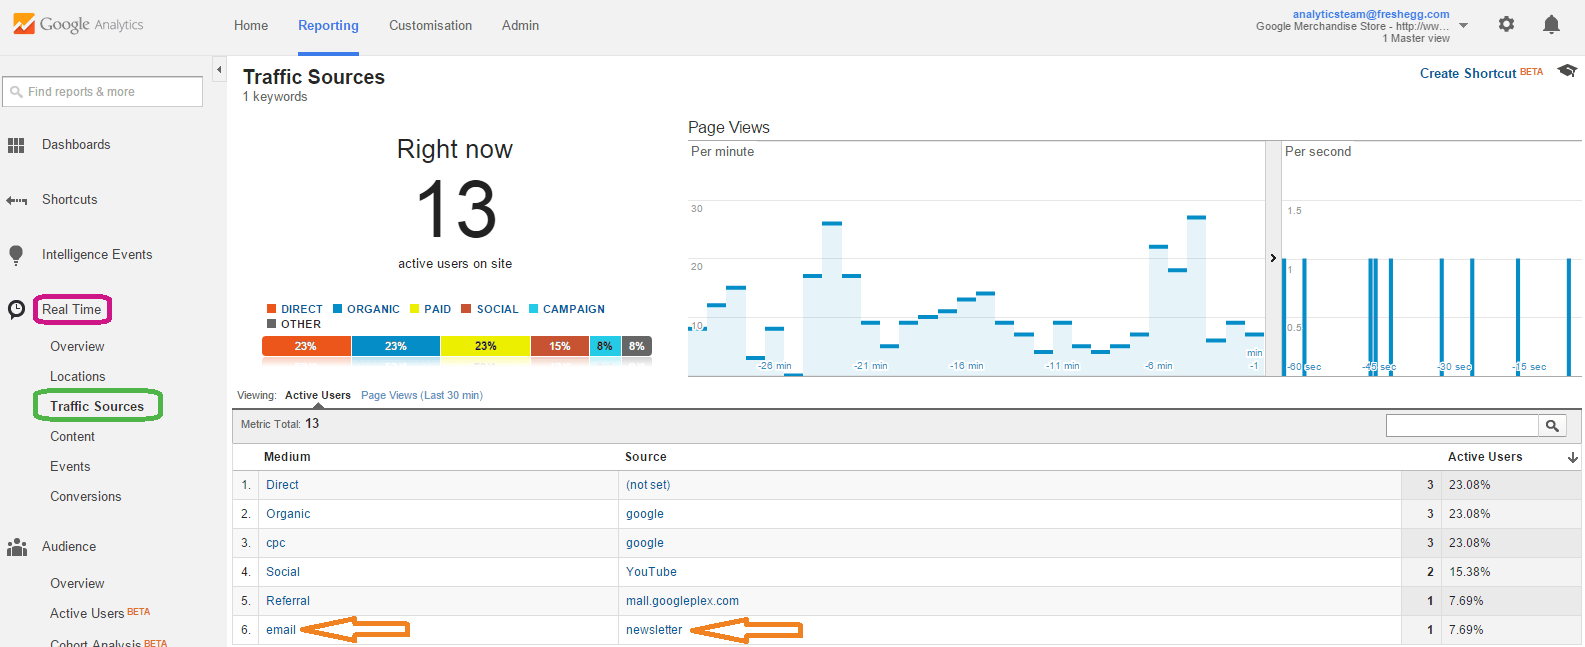
After visiting the site through the tagged URL (you can simply paste it into your browser and hit enter), the GA ‘Real Time’ report will show your tagged visit live on the site. Use the ‘Traffic Sources’ report check whether your source, medium and campaign terms have all come through to GA correctly.
The ‘email’ medium and ‘newsletter’ source appear in the ‘Traffic Sources’ section of the ‘Real Time’ report. Clicking on any medium (‘email’ in this case) will allow you to drill the report further by campaign name.
If you are working on a high traffic website, spotting your own campaign visit can be challenging. So, instead of using the backup view, it may be quicker to create a test view that includes traffic from your IP address only.
Watch this video to see how tagged campaigns were checked using Google Analytics on the Google Merchandise Store:
Get your free campaign tagging tool for Google Analytics
6. How to test tagged campaigns using Google Tag Assistant
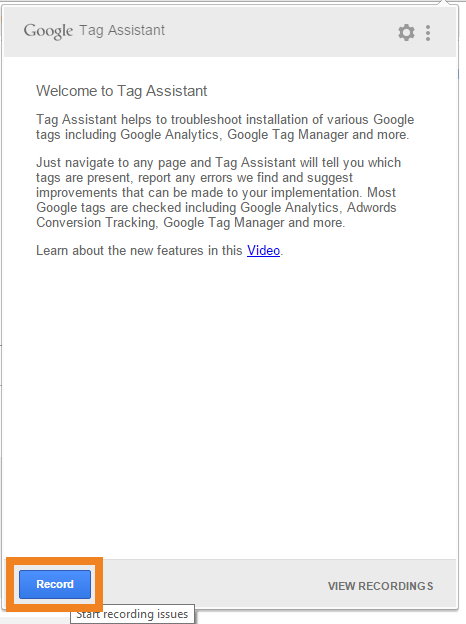
Google Tag Assistant (GTA) is a free Chrome plug-in (by Google) that checks Google tags and tracking on a site. Here at Fresh Egg, we use it a lot to debug tracking implementations for site audits but also to test our own campaign URLs.
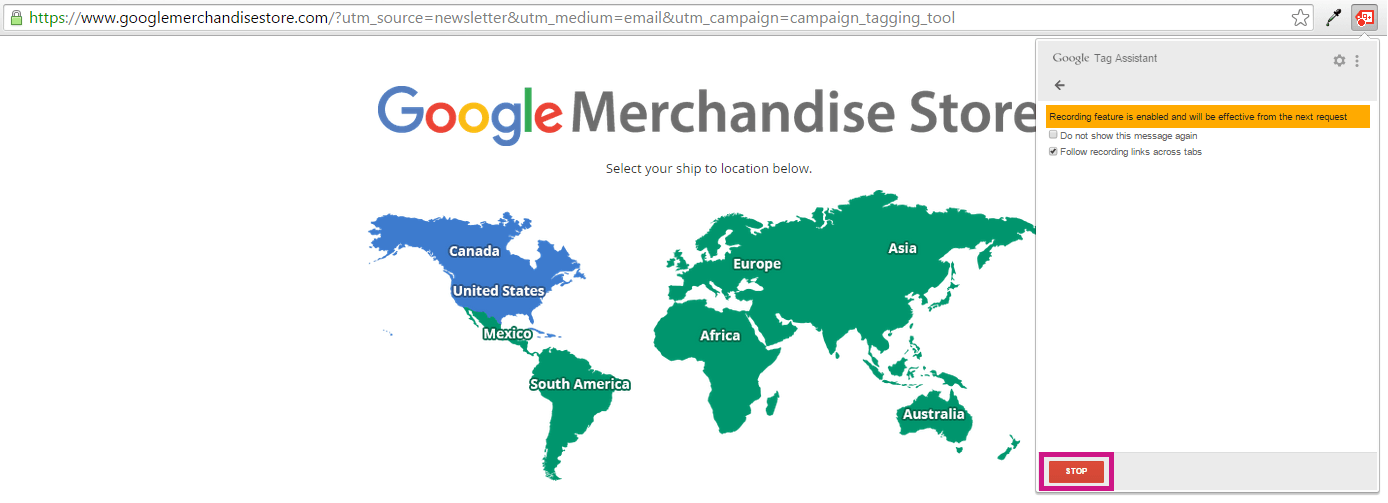
After installing GTA, you need to open up a new page within Chrome and hit the ‘Record’ button at the bottom of the console. This will allow GTA to track the activity from the point of using the tagged URL.
You should then visit your site using the tagged URL that you want to test while GTA is recording your activity. As soon as you reach the site with the tracking being tested, you can then hit the ‘STOP’ button.
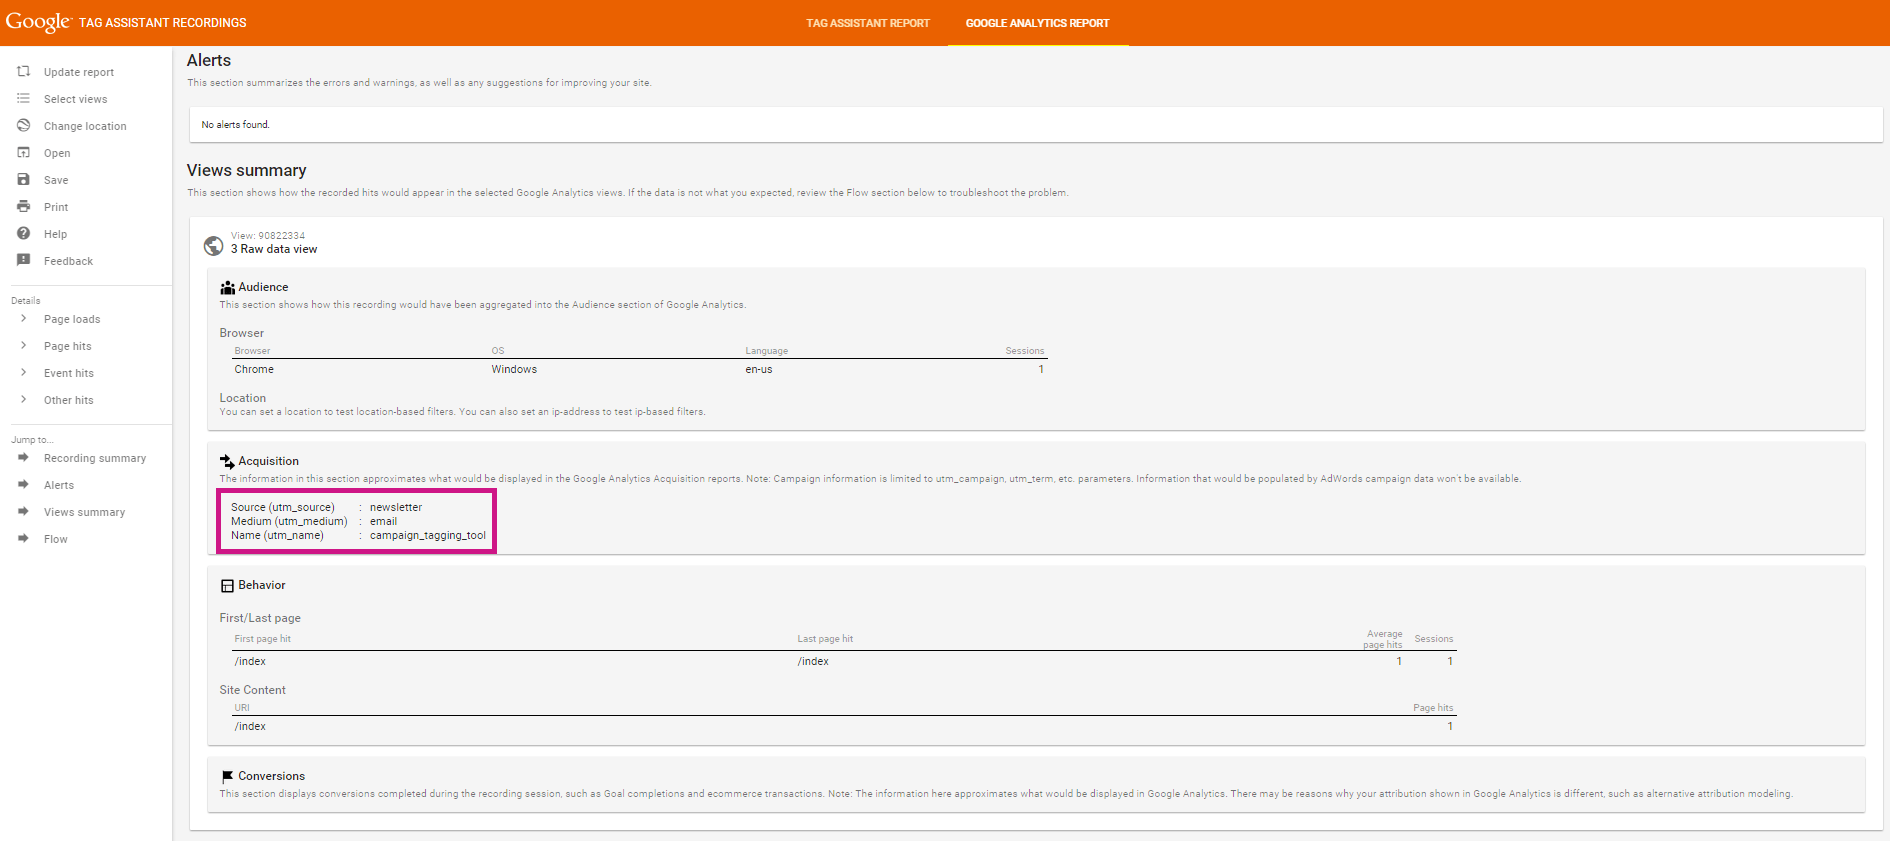
In order to verify that the campaign tracking has worked correctly you need to then look at the data that GTA has collected based on your visit. To do this, click the ‘Show Full Report’ button on the GTA console.

This will bring you to the data report of your visit to the site you are testing. After clicking the ‘Google Analytics Report’ tab at the top of the page, you will be faced with all of the data that was collected throughout your visit. Under ‘Views summary’, there are a number of separate reports. The ‘Acquisition’ report gives details on how you reached the site. If you have tagged your campaign correctly, you will see the correct source, medium and campaign names as assigned by you.
Watch this video to see how tagged campaigns were checked using GTA on the Google Merchandise Store:
💡Top tip
It’s always important to check your tracking works correctly using either Google Tag Assistant or a backup view in Google Analytics – there’s nothing worse than not having any data collected for a campaign that you have launched and not being able to analyse the campaign.
Download our campaign tagging tool for free.
Now you know how to set up and test campaign tracking, how are you going to analyse the data collected from this? Discover How to Use Google Analytics Campaign Tracking to Measure and Improve Your Digital Marketing Success and find out how we use campaign tracking in GA to track and measure the performance of campaigns against business objectives.
Do you have a Google Analytics challenge we can help you with?
Do you have a challenge we can help with?
Let's have a chat about it! Call us on 01903 337 580