
How to set-up a Google Search Console account
New to Search Console? This guide will steer you through the process of creating and verifying an account for your website.


The process
Setting up your Google Search Console is a relatively straightforward three-step process, but there are a few things to be aware of. The exact steps you take will depend on how your website is configured and what parts you have access to.
Step 1: Creating a Google account
To begin using Search Console, you will need a Google Profile account. If you have a website which already uses Google Analytics, Google My Business or any other Google product, use the same profile to set up Search Console. This keeps all your business-related properties in one account, making life much easier.
Read more about creating your Google account...
Step 2: Creating Search Console profiles
When you are ready to begin, there are a couple of choices for you to make about how to track the data on your website. This will ensure that you capture all the relevant information you need.
Read more about creating your profiles...
Step 3: Validating ownership
In order to use Search Console, you need to verify that you have permission to access and view information for your website. Google offers a number of ways to do this which we run through in detail below.
What is Search Console, and why you should use it?
Search Console (formerly Google Webmaster Tools) is a suite of services that allows you to monitor how your website is performing. Among other things, it lets you know which pages are being indexed in results, whether Googlebot is having problems crawling your site content and how pages are ranking in organic search results.
- Like other Google products, you need to create an account in order to access it.
- It is separate from Google Analytics, but you can connect the products if you use the same Google account profile.
- It uses sampled data, so you won't see everything. However, as Google Analytics lumps most organic search queries into 'not provided', Search Console gives you much more visibility into the queries customers use to find your website.
- It acts as a conduit between your site and Google. You can ask Google to index or hide pages, and Google will send alerts if it finds issues or problems as it crawls the site.
What Search Console isn't:
- A substitute for a web analytics package. Search Console is solely focussed on organic activity and tracks data in a different manner to Google Analytics, so you cannot get the same depth of information.
- Comprehensive. As mentioned, it uses sampled data and only keeps a limited amount of historic data for websites, although this has now been expanded to 16 months.
- Intuitive. It's a work in progress, and Google are putting effort into upgrading it. Currently, there are two versions: the old console and new console. You will find that some useful features are still located on the old console, but this will likely change over time.
To summarise, Search Console provides great insight into the technical health of your website as it is explored and interpreted by Googlebot, and it allows access to organic search behaviour not available in Google Analytics. There's a few things required to set up, but it's not difficult and well worth the effort.
Step 1: Creating a Google account
This is quite straightforward. If you already have a preferred Google profile account for your business, then use this one and simply log in to Google and skip to step 2.
If you don't currently have a dedicated profile for your business, then go to the Google account sign up screen and create a profile. This will automatically issue you with a Gmail address, but you can link a non-Gmail email to your account later, if you prefer to receive notifications to another email address.
- If someone else controls these details, such as a web developer, they can set up the Search Console profile and add you as a user. We'll cover this in a little bit.
- Don't have your company Google account details anymore? That's not ideal, but it won't stop you creating a Search Console account. Try using the account reminder features to see if you can reset access to the account. Otherwise if you set up a new profile, it won't allow you to link up data with Google Analytics or use one of the verification methods. If you don't mind keeping a separate set of log in details, you can still proceed.
Step 2: Creating Search Console profiles
From your preferred Google account, go to the Search Console product screen. This has recently been simplified to offer two main choices:
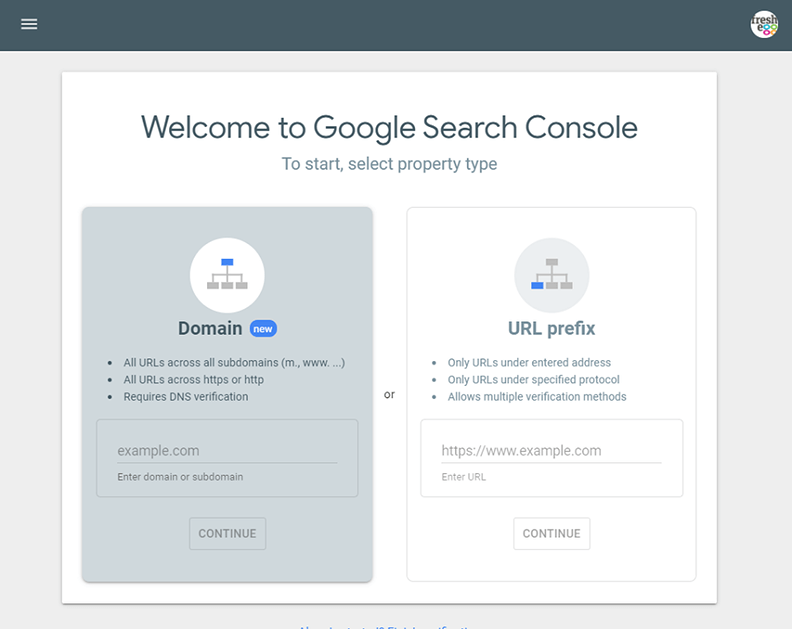
What do they mean?
Domain
Suppose you have a site that splits out content over different subdomains. Let's say you have an e-commerce section on shop.mysite.com, some useful forms on files.mysite.com, resource downloads on downloads.mysite.com and a customer area on members.mysite.com.
You could track all of these individually, and some sections might be more important to you and your business than others, but it would be a hassle logging in and out of different profiles. Using the 'domain' option lets you track everything that's happening across all the different subdomains so you don't miss issues or opportunities. You can use URL filters in Search Console to isolate specific subdomains if you need to.
Or you may have a site that has a section on secure hosting (https://) such as an e-commerce shop, and other parts that are non-secure (http://). Domain verification allows you to 'roll up' those properties into a single profile.
In order to select domain verification, you will need to have access to the DNS settings of your site hosting or be able to raise a support ticket with a developer or development team to make some changes. Don't select this method unless you can do this yourself or get a team member to action it for you.
Using the fictional example above, you would enter mysite.com as the domain property information in the form box and click 'continue'.
URL prefix
If you have all of your site content under one domain (e.g. you don't split content between subdomains, and the site is fully hosted on either https:// or http://), then you can choose this route instead.
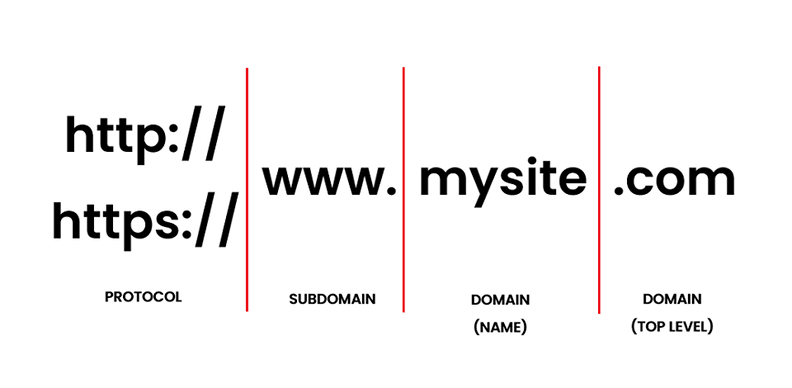
Note that Google is picky about URL prefixes. Anything that occurs before the main domain part of the URL is a prefix. If prefixes are different, Google will consider them separate websites. So make sure the URL you enter here matches the URL of your homepage exactly, or it might not track the correct data, or any data at all.
A quick jargon-buster reminder:
Once you have entered the domain or URL prefix of the property you want to monitor, you'll need to verify your ownership.
Step 3: Validating ownership
Why do I need to verify a website?
Search Console gives you access to important data about a website, as well as the tools to do significant damage to visibility if you use it improperly. It is important to verify that you have the right authority or ownership to view and make decisions about content on the site. Otherwise, you could register the profiles of competing sites and wreak havoc on them, and of course, they could do the same to you.
Google offers five different methods to verify your ownership. Each involves you having access to some important back end functionality, which non-owners shouldn't have. Let's run through them.
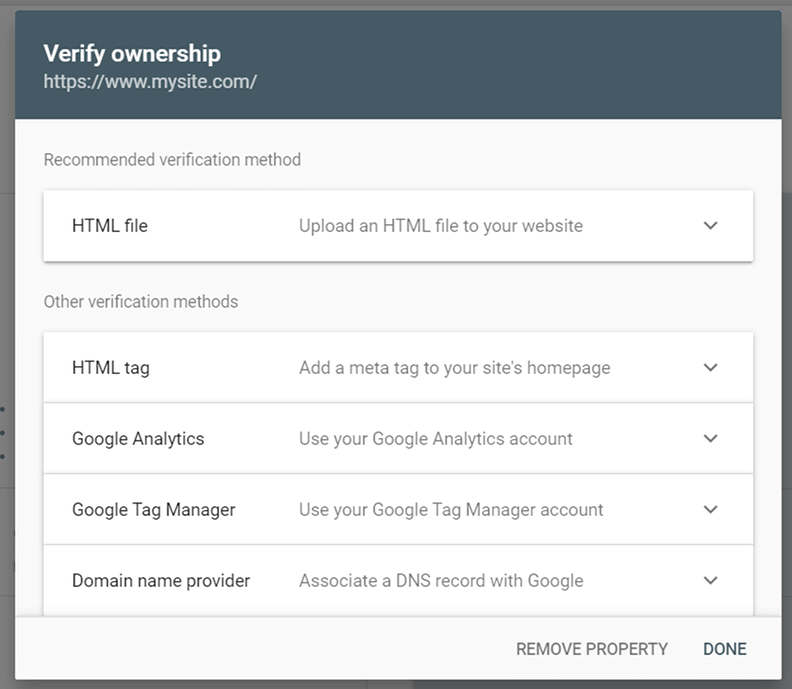
Method 1: HTML file upload
This is Google's recommended method of verification. It will give you an HTML file to upload to the root domain of the website. Click on the 'download' button to get a copy of the file:
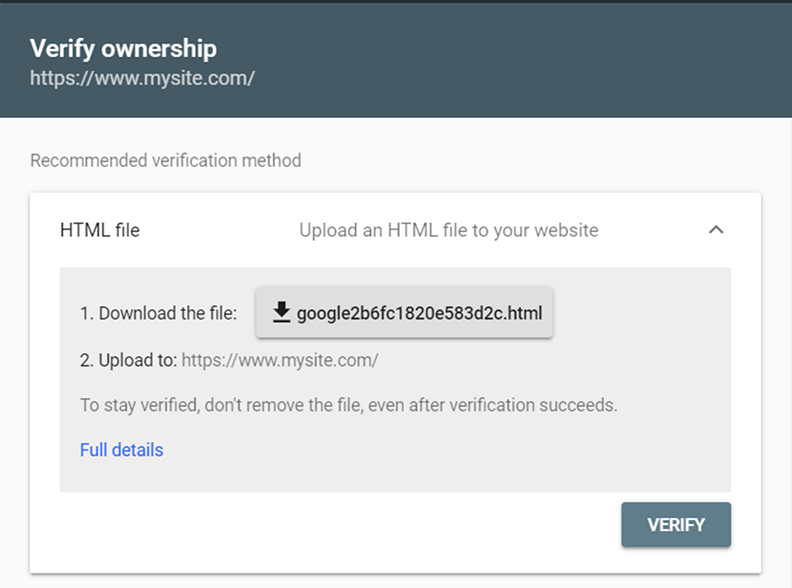
Important to remember:
- This is an 'empty' file - it's the name of the file that is important, not what it contains. Adding this won't cause load delays, slow down a website or 'bloat' site code.
- As the name is the important part (in this case, the snappily-titled 'google2b6fc1820e583d2c.html') don't rename it. Or let anyone else be 'helpful' and rename it to 'search-console-file.html' or something similar. Leave it the way it is!
- Upload the file to the root directory. So, in our example, I would upload the file to https://www.mysite.com and the final URL of the file would be https://www.mysite.com/google2b6fc1820e583d2c.html.
This is where ther verification process is going to look for the file, so if it goes into any other directory folder (e.g. https://www.mysite.com/home/ or https://www.mysite.com/index/) then the validation will fail. - Once the file is in place, you don't need to link to it anywhere on the public-facing website; it's just for Google and customers don't need to see it.
Once the file is in place, click the 'verify' button and keep the file in place. Don't delete it.
Common reasons for this not working:
- The FTP or file upload/transfer system puts the HTML file somewhere other than the root directory of the site.
- It has been resaved as another file format, such as a .txt file, instead of a .html file.
- It has been renamed and doesn't match the file the profile verification is looking for.
- It gets deleted on the website. Often, businesses have workflows where site developments are tested on a staging environment, which then overwrites the live site if it passes review. If the verification file isn't present on the staging environment, it can rewrite a 'blank state' in some cases, wiping the verification from the live site. If your verification stops working after a development sprint, it's likely that you need to get a copy of the file on the staging site, too.
Method 2: HTML meta tag added to the site homepage
Another quick and easy method, which involves copying the code tag Google gives you and pasting it into the <head> section of the site's homepage.
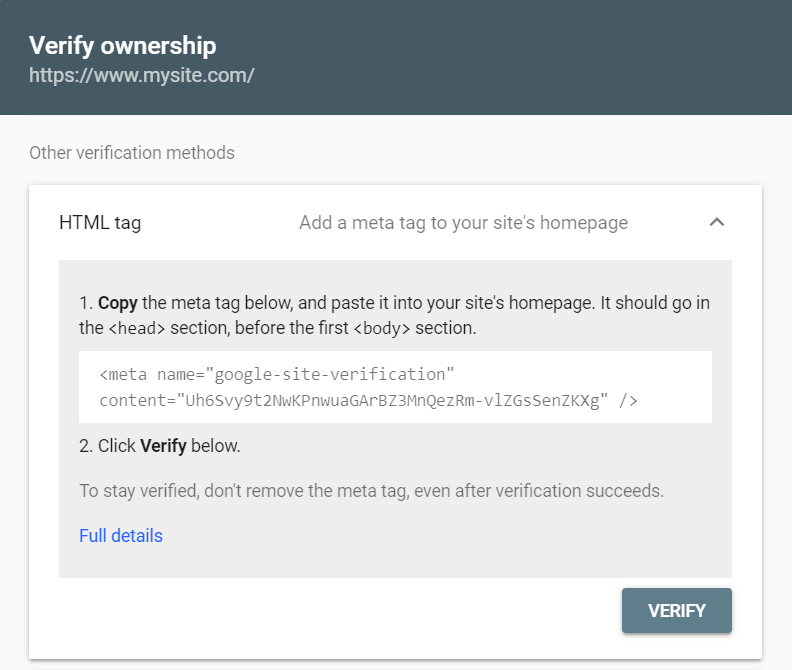
Important to remember:
- Again, this won't have any performance impact on your website.
- It needs to go in the code of the homepage - the same page you stipulated in your Search Console profile in step 2
- It needs be in the right place in the page code. It goes in the <head> section, before the first <body> tag on the homepage.
- You only need this on the homepage. It doesn't need to be featured on any other pages on your website.
Once the tag is there, click 'verify' and keep the tag in place.
Common reasons for this not working:
- The homepage URL is different from the URL used in the Search Console profile.
- The tag isn't in the <head> section of the page code.
- The text in the tag has changed. If pasting in the code, use a text editor like Notepad to copy and paste the snippet. Pasting from word processor programmes can sometimes add in 'junk' code.
- The tag has been deleted. Check that staging sites updates include the tag on any development push, so you don't have to keep re-adding it to the live site.
Method 3: Using an existing Google Analytics account
If you already have Google Analytics set up for your website and you are using the same Google profile account for Search Console, you can use one to verify the other.
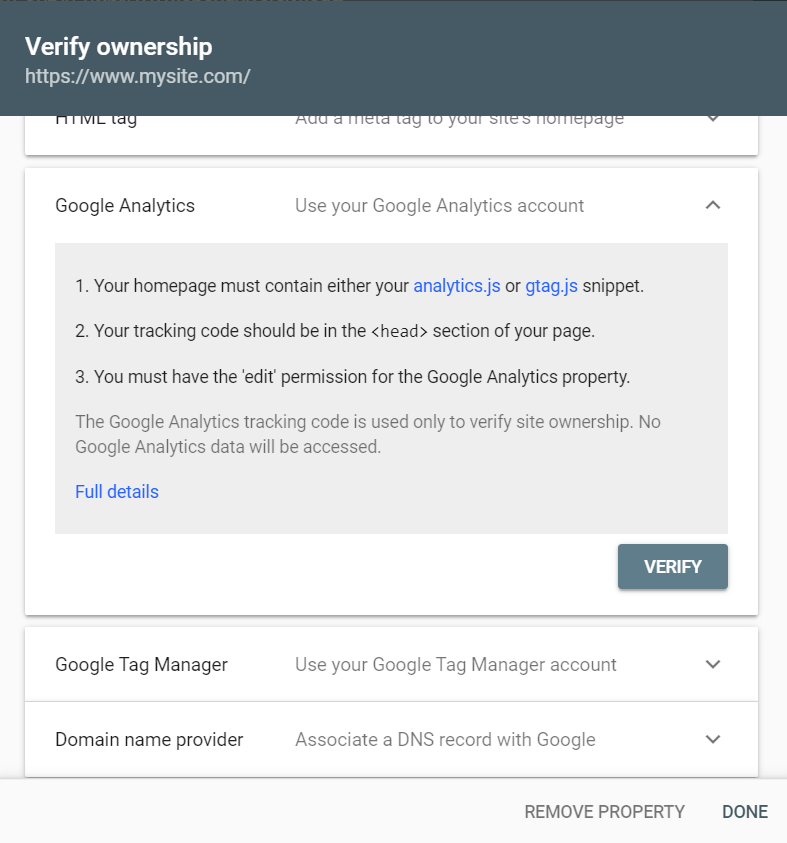
Important to remember:
- You obviously need to have Google Analytics set up and authorised before you can use this method.
- This needs to be using the global site tag (gtag.js) used by the lastest version of Google Analytics.
- You must have the correct user privileges for the Analytics account on your Google profile. You must be able to edit the Analytics account; 'view only' access is not eligible to verify the Search Console profile.
If you are happy you meet the criteria, click the 'verify' button.
Common reasons for this not working:
- Search Console and Google Analytics are on different Google account profiles. This is one of the reasons it's a smart idea to set them both up using the same profile. You can't use this method if you have different log in details for Google Analytics and Search Console.
- Your Google Analytics account doesn't use the global site tag. There have been different versions of Google Anlaytics over the years, and most legacy versions should have automatically transferred to the newer Universal Analytics tracking script, which isn't the same tag as the global site version.
The gtag.js is often used for sending data to Adwords, so if your site doesn't have this feature activated, you may be using the Universal tag instead. Some businesses use Google Tag Manager to handle Google Display and Adwords data. If so, there's a dedicated method for this (see below). - A legacy tracking code. You can check this if the tracking code fires at the bottom of the page, not the top (google-analytics.com/ga.js).
- You don't have the right access permissions in Google Analytics (user view as opposed to editor access).
- Google changes something. Verification using this method sometimes drops out (the last instance of this happening coincided with the upgrade to Universal Analytics). It's possible that further updates to Analytics or Search Console may have knock-on impacts for linked accounts.
Method 4: Using Google Tag Manager
If you have Google Tag Manager set up for your site, and you are using the same Google profile account for Tag Manager and Search Console, you can use one to verify the other.
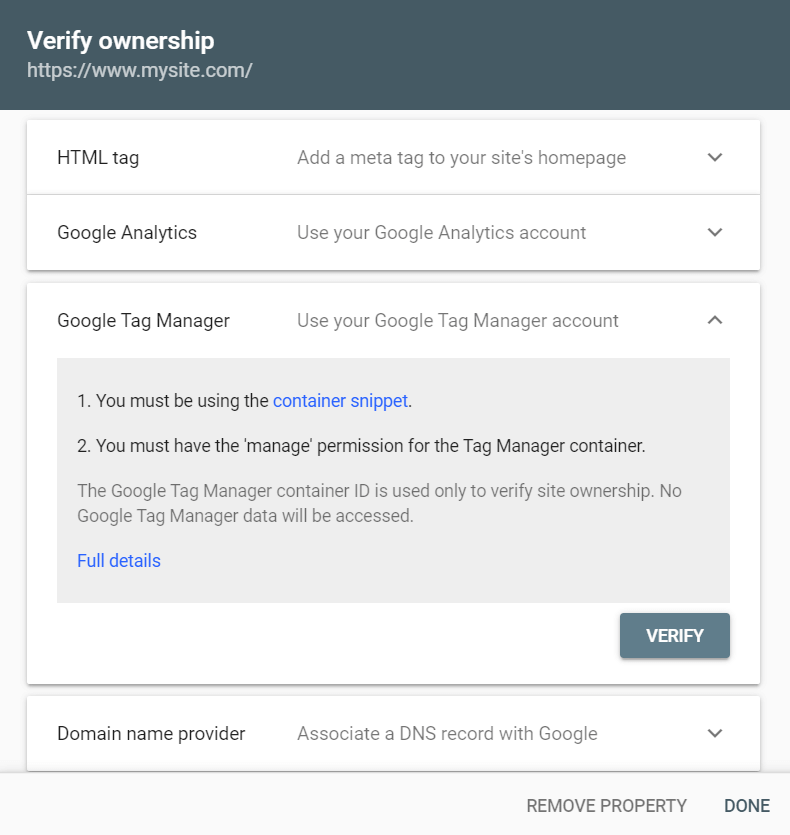
Important to remember:
- You need to have Google Tag Manager set up and authorised on the same Google profile. Like Analytics verification, this relies on you having the same profile for both products; it won't work if you use different log in details for Tag Manager and Search Console.
- If your site uses Tag Manager to handle data for search and display adverts (many do, as it offers a bit more flexibility than Global Site Tag tracking), this is probably the best option for you.
- You need to be using the 'container' snippet.
- You need to have 'manage' user access for Tag Manager.
If you're happy that you meet the requirements, click 'verify'.
Common reasons for this not working:
- Search Consiole and Tag Manager use different Google account profiles.
- Like Google Analytics, you need to have the correct user privileges. Search Console states that you need "View, Edit and Manage container-level permissions in Google Tag Manager" which is unhelpful as the container-level permissions listed in Tag Manager are 'no access', 'read', 'edit', 'approve' and 'publish'. I recommend setting phasers to 'approve' and seeing if this enough.
- It also needs to be in the right snippet type (container). Moving Tag Manager scripts around the page and putting them in places where code tags can interfere may cause errors.
Method 5: Using a DNS record
When you registered for your website domain, you should have access to an administration panel via the domain name provider (the company that sold you the domain and asks you to renew it). This lets you edit the DNS (domain name system) records. This is what translates domain names into IP addresses. Editing a record tells Google that you own the domain and any associated subdomain.
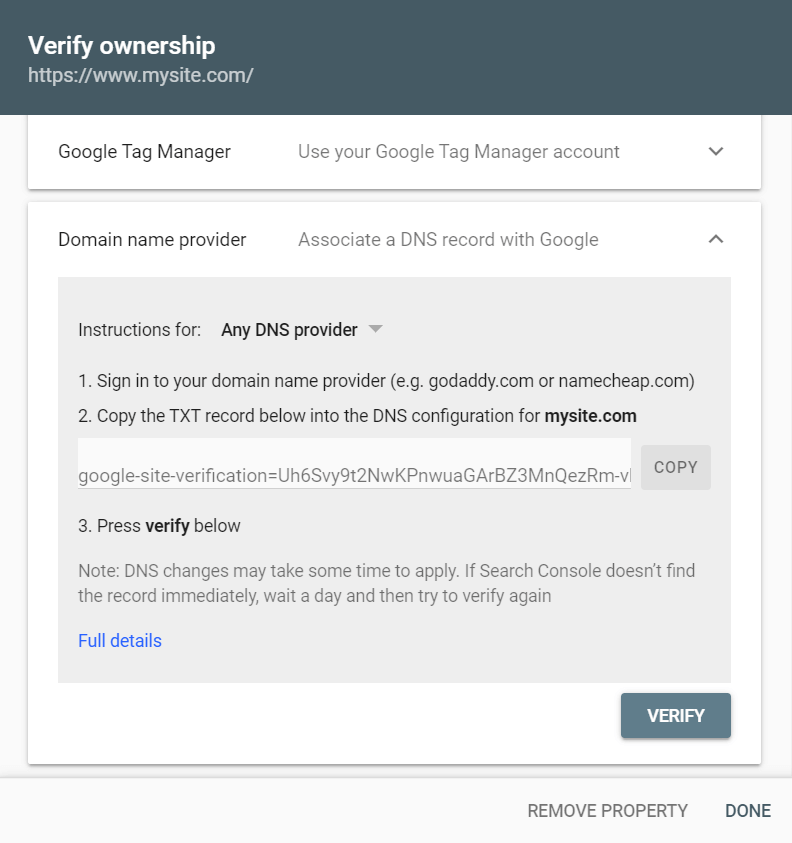
Important to remember:
- You will need to have access to the DNS record interface, or be able to pass along the text record in the verification panel to someone in your team who does.
- This is the only method you will be able to use if you select the 'domain' option for Search Console in step 2. You can start the process (to obtain the text record) and verify later, once the DNS record has been amended.
Once this has been done, click 'verify'. Note that DNS changes often take some time to register, so you may have to wait 24 hours after this has been done to successfully validate the Search Console profile.
Common reasons for this not working:
- Incorrect text on the DNS Google site verification file. Ensure when you copy and paste the file that you use a text editor. Word processors sometimes scramble code or add junk characters.
- Patience! Sometimes DNS record changes happen quickly and other times, less so. Try again in 24 hours to see if it's worked.
Hopefully, you now have things set up and verified using one of these methods. If so, relax! That's the fiddly bit over. You'll either be able to see data already, or you'll see a message from Google telling you it's doing its best, and to check back a bit later when it's got some data to show you.
If not, then all is not lost:
- Try using different methods to validate the profile. This may involve entering different sites using the 'prefix' method instead of the 'domain' one, if you can't get the DNS verification to work.
- The meta tag or HTML file methods are normally the easiest and quickest to get verified.
- Relax, you are not alone. There is a help centre for Search Console which has official guides, but more usefully an experienced community that can weigh in to help you with specific issues.
Once you have created and verified your profile , you can start making use of the tools and data that Search Console has to offer. For a new site, some of the reports might take a few days to start collecting data but you should soon start to see useful insights appearing.
Further reading
Do you have a challenge we can help with?
Let's have a chat about it! Call us on 01903 337 580