
How to Conduct a Google Analytics Health Check
Download your FREE template, then use our step-by-step guide and use it in tandem to complete the health check.


When did you last check your Google Analytics implementation?
Do you trust your data? When did your website last change, and do you know how this impacted your Google Analytics data? Web analytics data is powerful, but only if it is accurate. We frequently run health checks on new and existing clients' Google Analytics and Google Tag Manager (GTM) implementations to ensure the data is accurate and can be trusted.
Use our free downloadable template with this guide, which walks you through the stages our team goes through when conducting a Google Analytics health check. It will give you a true understanding of the elements you need to monitor to ensure your GA setup provides the highest-quality data.
The health check contains the following steps:
- Data collection checks
- GA configuration checks
- Data protection
- Data quality checks
- KPIs
- Advanced tracking
- Summary
A quick disclaimer: You'll need a reasonable understanding of Google Analytics to get the most out of this guide. However, even if you're starting to experiment with your Analytics setup, it will deepen your knowledge of the tool and help you identify issues and opportunities with your setup.
Once you download, you will find:
- Summary sheet
- Health check checklist
- Actions list
- Custom tracking
- Measurement plan temlate
Simply complete the short form to access your FREE Google Analytics health check by email.
Loading
If you’re unsure about any of the terms or features mentioned in this guide, Google provides a helpful glossary to help you navigate both Google Analytics and Google Tag Manager.


Asher Dolton Martin, Web Analyst
#1. Data Collection
First, we'll check how data is being collected. This will give us a foundational look highlighting any critical underlying issues and inform our more granular checks later in the audit.
In this section:
- Google Tag Manager
- Consent settings
- GTM naming convention
- Google Tag used
- Measurement ID variable
- DataLayer
- Cross-domain configuration
- In-built tags, triggers and variables
- Conversion linker tag present
- Non-GA tags and redundant tags, triggers and variables
- Tracking code on every page
- Config observations
Google Tag Manager
The first check is relatively simple: is GTM being used for data collection? We'll be checking in a few places:
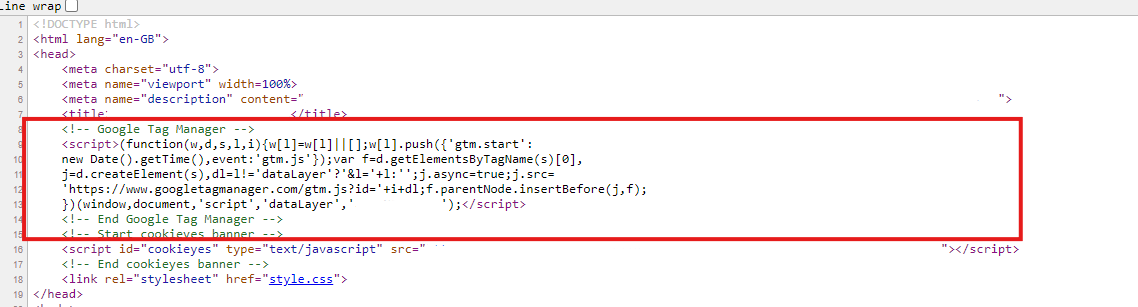
- Is the Google Tag Manager code in the <head> of the website pages?
- Is the data stream listed in GA?
- Are Google Analytics tags firing from GTM, or could they be implemented via a plug-in or even hard-coded into the site?
Consent Settings
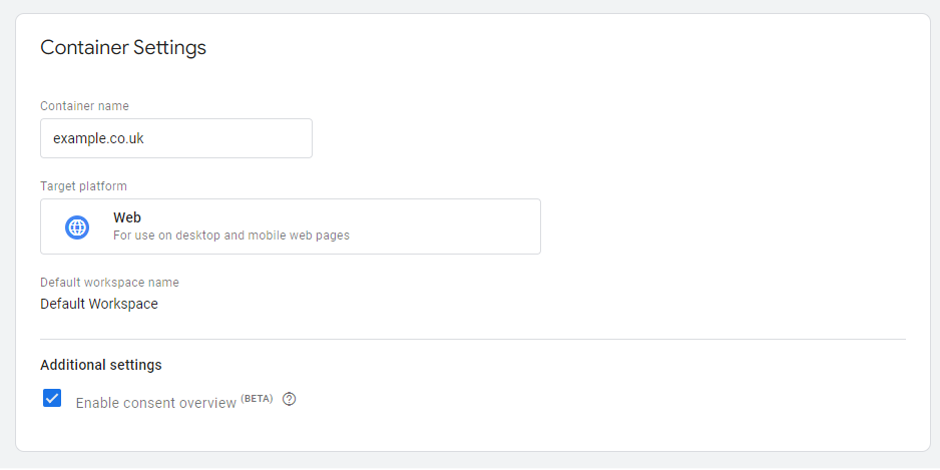
The consent overview is a helpful setting in GTM for seeing which tags have been configured with consent permissions. It is crucial to ensure that your tracking setup is GDPR compliant.
- Is consent overview activated in GTM?
- You can find this in the GTM settings. A shield icon should appear in the 'Tags' folder when turned on.
You will then check that all tags have consent settings configured in GTM.
- If consent overview is turned on, click on the shield icon. This will give an overview of all tags configured for permissions or not.
- You must configure relevant permissions for tags depending on their type, e.g., analytics, marketing, functional, or necessary.
- You will also need to configure the consent banner correctly to map out these categories.
GTM Naming Convention
Having a consistent naming convention across your tags, triggers, and variables helps to keep your tracking clear. It prevents you from doubling up on tracking certain events and allows you to monitor when certain tags may become redundant or need amending.
Please find more information in our naming convention article here.
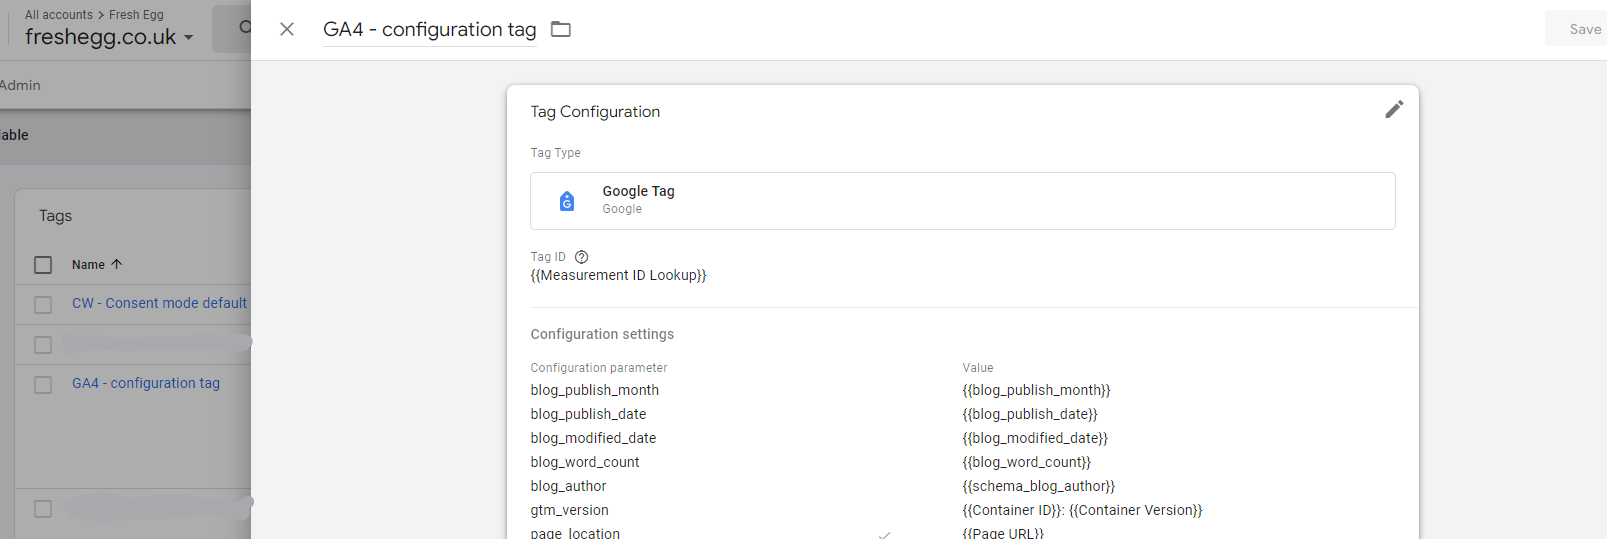
Google Tag used
This tag has replaced the config tag in GTM and is used to send data to different destinations (e.g., Google Analytics, Google Ads, Floodlight). This element is vital to linking your data to your GA property.
- Is the Google Tag present in GTM?
- Is a tag ID (or measurement ID variable – see below) listed in the tag settings?
- Does this ID match up to your GA property?
- Are multiple Google Tags used for GA and Ads, or is one tag sending data to multiple destinations?
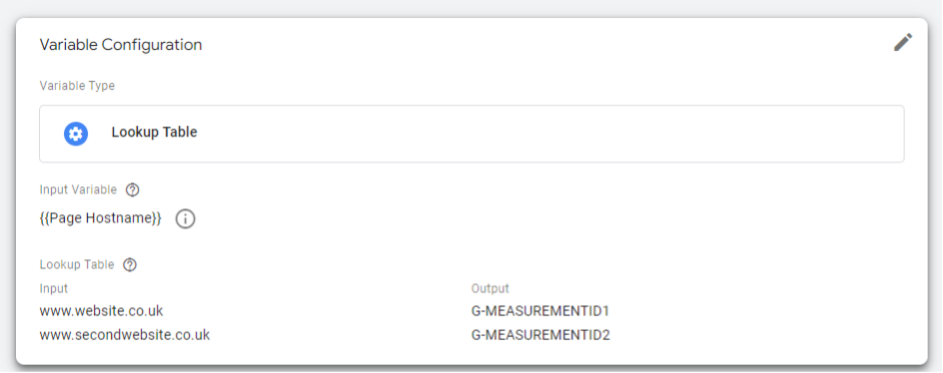
Measurement ID variable
You'll need a measurement ID for every tag in GTM. The ID lets GTM know where to send the data collected by your tag. One option is manually entering your measurement ID when setting up a tag. However, this requires more effort up front, leaves room for errors in inputting the ID, and can't be easily changed if you need to change GA properties.
At this point, it's worthwhile creating a measurement ID variable. You use this variable to assign your property ID to your tags. Creating measurement ID variables for each relevant property can also enable you to set up tracking to multiple destinations quickly.
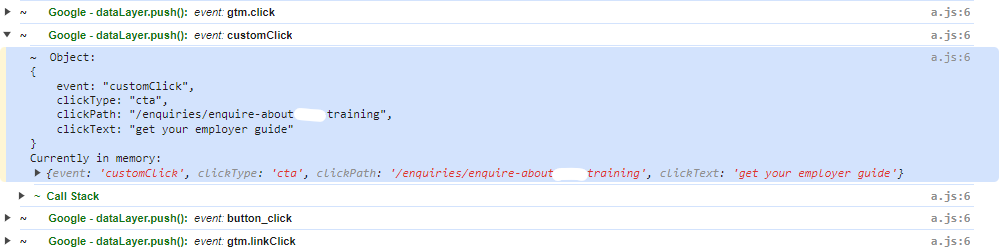
Data Layer
Are you using the data layer to make information available for GTM tags?
You can add the data layer to your site's source code. It contains all the information you want to pass to Google Tag Manager. In general, event tracking using the data layer can be more robust than other mechanisms, so utilising it where possible is worthwhile.
Cross-domain configuration
Ensure you have cross-domain tracking correctly configured. This feature helps you track users travelling between your different domains and subdomains.
For example, say that a user visits your website via an organic search. They click on a link to another one of your domains but eventually return to your main website. If you are not correctly tracking that journey, that user will likely come up as two separate users, i.e., one organic search and one as a referral.
Depending on the traffic volume, this could start majorly skewing your referral traffic figures, the sources of referral traffic, and the number of users visiting your website.
To prevent this:
- In the GA data stream settings, you must list any of your domains.
- Review referral traffic sources periodically to ensure you add any new or additional domains to this list.
- Ensure that tracking configuration is in place for these domains.
In-built tags, triggers and variables
Where possible, avoid custom tags, triggers, and variables in favour of more robust in-built elements. Custom elements could impact page load times and create conflicts as browsers introduce new features.
These issues can, in turn, negatively impact your site's ranking from an SEO perspective. It is important to note whether you use custom HTML tags and whether it is possible to replace them with in-built features, such as using Facebook/Meta tags over custom HTML for a Facebook pixel.
"Anything that impacts load time and functionality onsite could impact your website’s ranking with Google. Custom tags, in particular, can be an issue regarding website functionality. Our advice is to regularly check that they are not causing issues."

Julian Erbsloeh, Head of Data & Insight
Conversion linker tag present
If you run ad campaigns, you must ensure a conversion linker tag is in place. Doing so ensures that information from users clicking on your ads carries through when they've converted onsite. It's essential to remember that this is an audience you pay to acquire, and you want to ensure you're making effective marketing decisions around it.
Non-GA tags and redundant tags, triggers and variables
We want to ensure that a GTM container is as lean as possible while containing all relevant tracking. Whenever a user loads a page on your website, the GTM container must also load in the background. That extra processing can slow down your website load times, which, in turn, can impact areas like your search engine ranking.
It is good practice to monitor what is in your GA container, especially checking whether the tags are still relevant or whether you can delete them.
Tracking code on every page
Fundamentally, you must track every page on your site correctly. If any pages aren't tracking, you will see incorrect or skewed figures about users onsite: pages that look like they're not getting enough attention, multiple user sessions, and more.
You must include the GTM tracking code in the <head> of every page on your website. As a result, it is an incredibly easy element to miss out when publishing new pages on-site. Google Analytics has a report in.
Data Streams > Configure tag settings > Admin > Tag Coverage
Here, you can check for any untagged pages on your website, but there are some essential things to note with this feature.
Often, pages that are flagged as not having tracking code do have the code in place, but there can be other reasons they are listed here, for example:
- The pageview could be firing late
- Or the tracking code may not be in the
<head>Section.
Manually review any pages listed to check if they need the tag code.
![]()
Config observations
As you’ve gone through the first part of the health check process, are there any specific or general themes regarding configuration that are worth noting overall? These may carry through to other problems found later in the health check, so it’s good to keep a note to refer back to.
#2. GA Configuration Checks
The next series of checks examines the specific configuration of your GA property.
To do this, we go to the 'Admin' section in GA. Our free health check template contains additional steps on what to look out for in each of these checks, but below is an overview of the sections.
Property Settings
Setting an industry category preconfigures suggested audiences in GA. It is a simple step that populates potentially more relevant information into your reports.
The reporting time zone should ideally match your or your targeted region's time zone. This information must match the time zones of advertising platforms like Google Ads; otherwise, campaign data can become skewed.
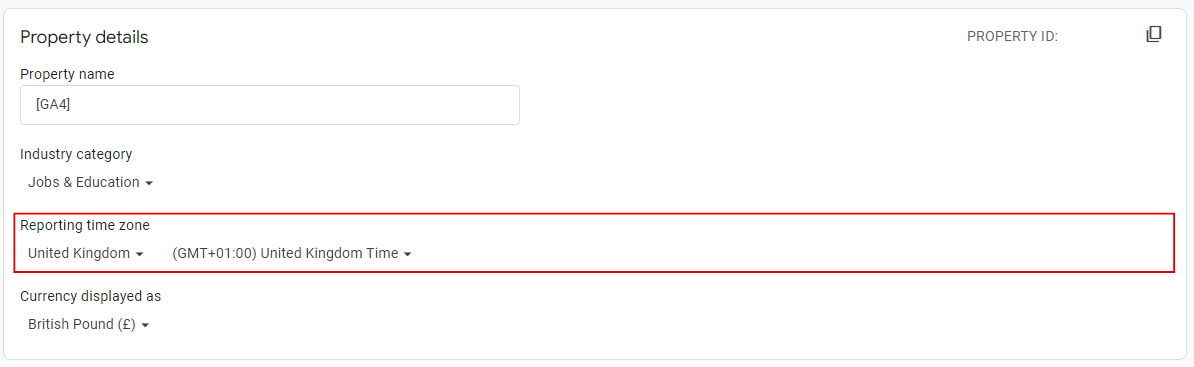
Regarding currency, this should match the settings in your AdWords account to ensure any cost and ROI data is accurate. If your website processes transactions in various currencies, GA will convert these into the currency selected here for reporting purposes, provided it is set up correctly to mark up the currency of each transaction.
To check if this is working as expected, compare your order revenue for a sample of transactions in different currencies with what's reported in GA.
💡 Top tip!
In the UK, you'll want to select the 'United Kingdom Time' option, as this will ensure that when daylight savings comes into effect, the timing of your reports adjusts automatically.
Property Access Management
Over time, it's easy to lose track of who has access to data on your property. However, it is vital to keep up with this, particularly when looking at data protection and security issues. It's good to keep an eye on the following:
- Who has access to your property
- Is it through a personal or work email?
- Where possible it’s best to ensure these are work emails as it’s a better guarantee that the only people with access to your GA property are people currently working with your company or contractor
- What level of access are people granted?
- People should have the lowest level of access necessary to perform their role. This level helps with data protection and ensures that your GA configuration isn't subject to changes by any individual without your knowledge.
- How many admin roles you have
- This aspect relates to both GA and GTM. Suppose there is only one admin role on the account, and that email is deleted (for example, an employee leaves an organisation and has their email removed from the system). In that case, you will lose access to that property/container for good. It is crucial to remember that you have at least a couple of admin roles on each account or at least an expected permanent email address.
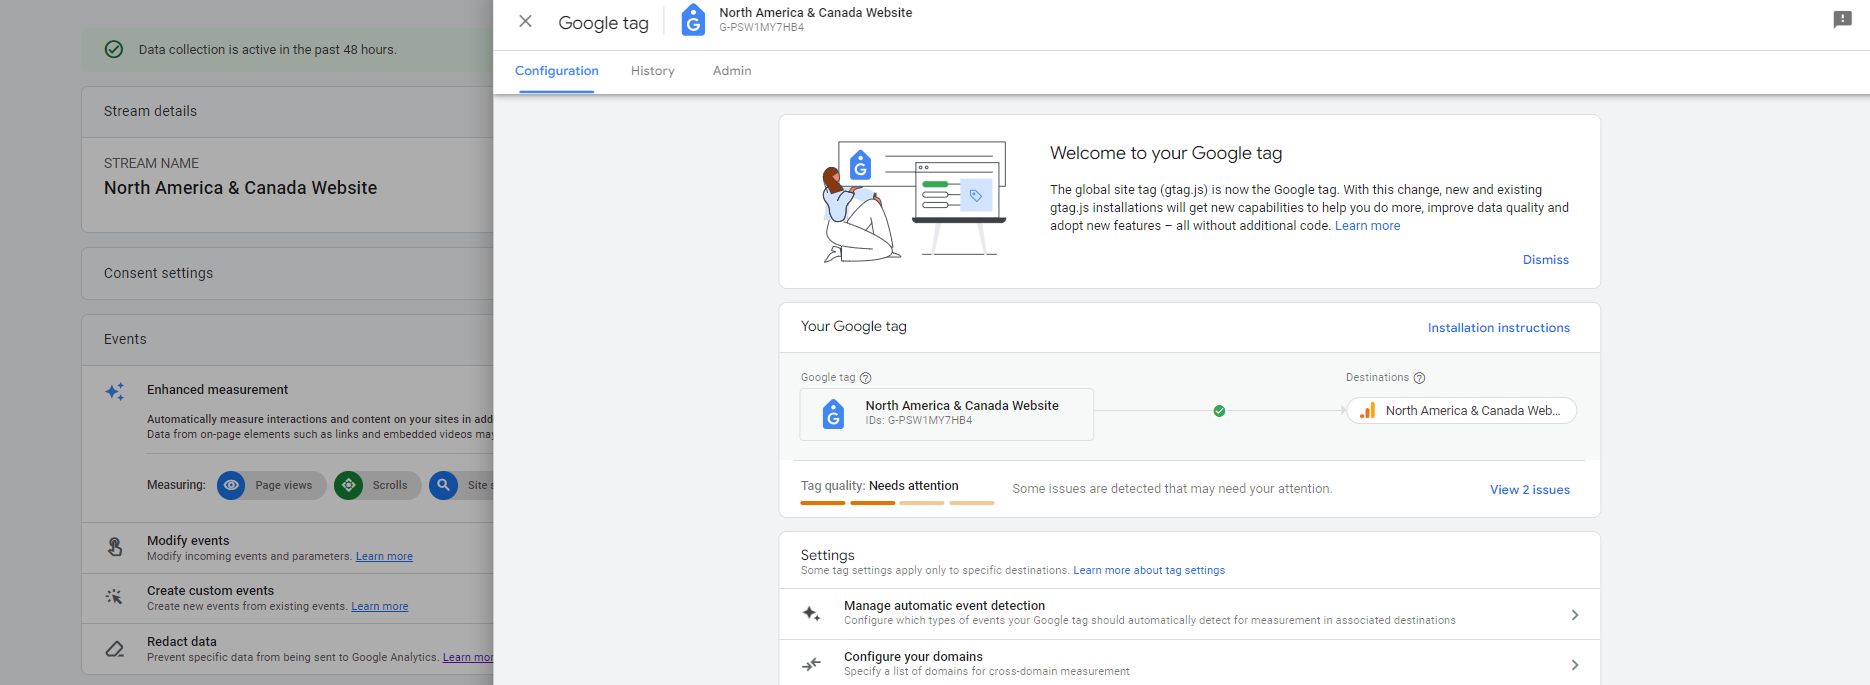
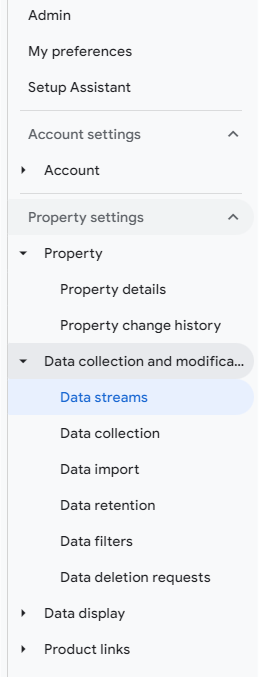
Data Streams
This follows from your data collection checks. It is a standard but crucial check to monitor the source of your data and any additional settings in place. Here, we'll check which data streams are connected to your GA property and if data collection is active. For example, has data been coming in for the last 48 hours?
Taking note of any enhanced measurement settings helps to inform what types of tracking we have set up, such as if the property is leaning more on enhanced measurement than manually configured events in GTM. It also lets us check for any double-ups in data collection points. For example, are page views automatically collected and manually set up in GTM? Is there anything not set up in the enhanced measurement tab that is also not in GTM? Are there any custom events set up, and how are they configured? Is data being pulled in from a third party through the measurement protocol?
These checks can quickly pinpoint any anomalies we see in the data later on and help us diagnose them more efficiently.
Data stream tag settings
Next up is looking at the specific settings for your data stream.
Many of these steps will be informed by earlier checks, and may require further investigation using the ‘Explore’ report function to come to the best conclusion about the most appropriate settings for your circumstances. This is particularly the case with settings such as defining internal traffic, unwanted referrals, redacted data and session timeouts. It also makes this a section worth revisiting once the full audit has been completed, as there will likely be later findings that change the recommendations the audit results in.
There are some blanket recommendations, however. If on, UA event collection needs switching off as Universal Analytics is no longer processing data. Keeping this setting on can confuse reporting and where data comes from.
Defining internal traffic is essential to prevent data from internal activities from skewing your database. For instance, how often does a team member go to your 'Contact Us' page to find the company address, and how will that affect reporting if there's no way to filter this out?
The ‘automatic event detection’ check works in a similar way to the ‘enhanced measurement’ above: to see what’s being automatically measured, what events have been manually set up, and potential areas of duplication.
Events, conversions (key events) and audiences
You will find many checks in this section in the KPI section further down in the health check, but they are featured here due to their overlap with GA. For marketers, this makes it more digestible when completing initial checks and taking action to correct different issues. As such, you'll find further guidance on events, conversions, and audiences in the KPI section below.
When looking at the events report for the first time, take stock of what is there, including:
- How many custom events are in place
- Are the naming conventions clear?
- Do most key interactions seem to be tracked, or are they missing?
- Sense check the numbers. Does anything stand out as being too high or too low?
- Do we have a silly amount of scroll events, for example?
- Or do we have more 'form_submit' events than 'form_start'? Are there clear funnel steps for an ecommerce website?
You can check events in the admin section, where you can see which ones have been selected to be tracked as key events (conversions), or in the standard events report, where you can see which parameters are sent with each event.
For custom dimensions and metrics, it is essential to check that every non-default metric or dimension set up in GTM is also set up in this section, as otherwise, it won't pull through into your GA data. There are also some blanket recommendations for custom dimensions to implement in GTM and GA: GTM Tag Name, GTM Container ID, GTM Container Version, and GTM Event.
Data settings and more
You will find the checks for this section within the data tabs in the Admin section of GA.
These are a series of checks impacting various data collection and reporting aspects, working more as a catch-all for any additional configuration checks.
Excluding internal traffic
When looking at the data filters, you'll need to ensure that if you're looking to exclude internal traffic from your data, you have tagged all internal IP addresses with a traffic_type of 'internal'. Another important note is whether you have set your data filters to the correct type: data listed as 'testing' will still appear but will be tagged as internal.
Traffic is excluded everywhere if the data filter setting is 'active'. It's worth checking that you have the most appropriate setting to ensure you're not losing potentially valuable data from your reports.
Are you using custom channel groups? Channel groups created for specific audiences are particularly useful for tracking ad campaigns.
The reporting identity check has a couple of considerations. If your data has a particular issue with thresholding, switching the reporting identity will likely significantly help reduce this. However, if you have advanced consent mode configured and wish to use Google's data modelling for unconsented users, you must set the reporting identity to 'blended'.
Further information on thresholding is in the 'Data Quality' section.
Integrations
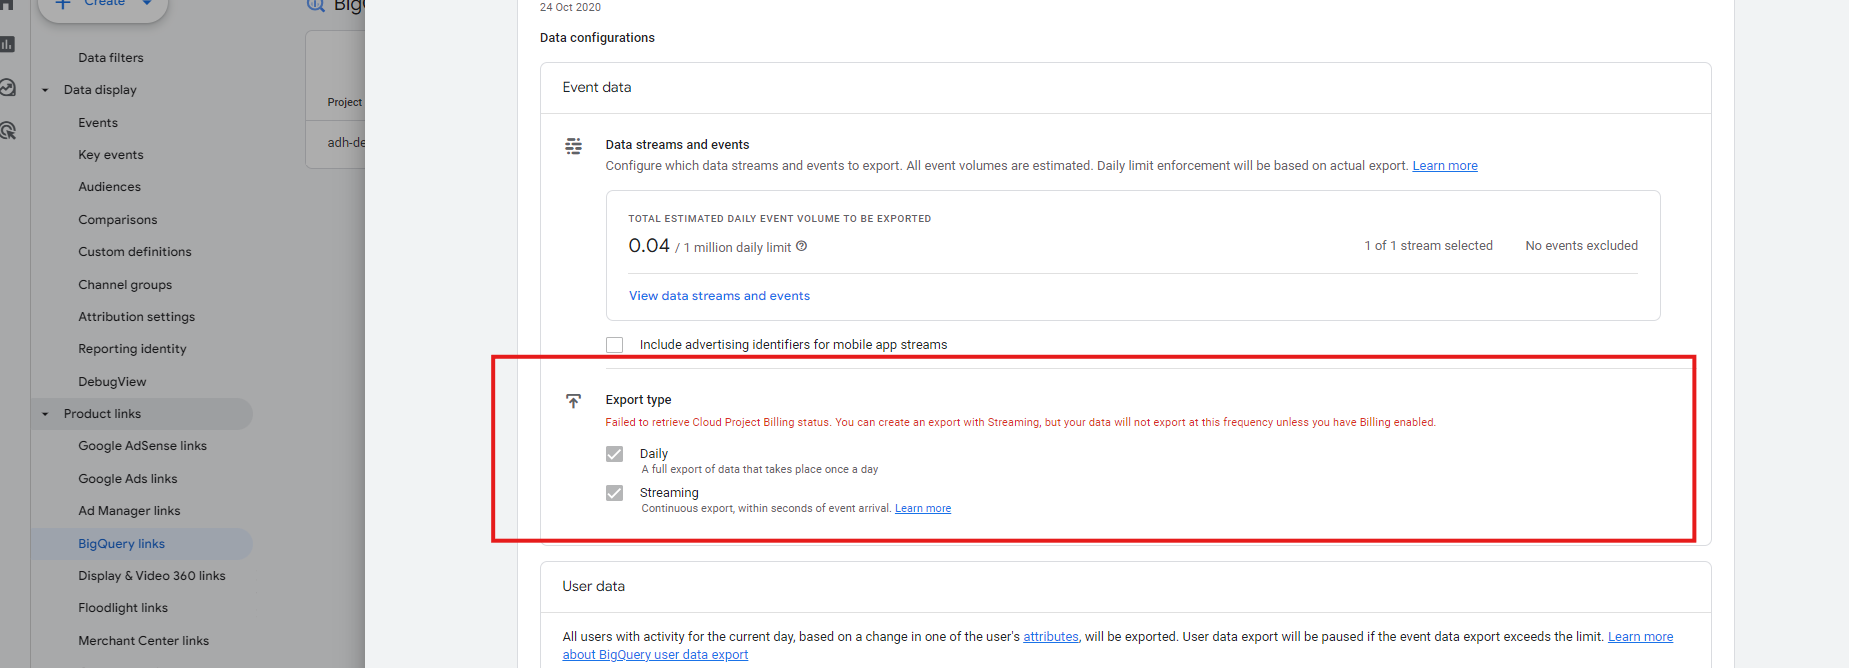
This section reminds you to note any products integrated into your GA setup, such as Google Ads, Floodlight, Search Console, etc. You should go into each one individually to double-check them, ensure that all products linked are relevant, and remove any redundant links.
For products like BigQuery, checking if billing is enabled on the account is crucial. If not, daily exports won't occur for your GA property. Rectifying the issue will allow daily exports to begin again, but they won't include retrospective data, leaving potential gaps in your datasets.
If one or more Google Ads accounts are linked, check that the data appears in the Google Ads reports in the Reporting section. Do the traffic totals roughly match the 'Paid Search' traffic in the Acquisition reports? It's possible the business uses multiple Ad accounts but has yet to link them all, or you only use a single Ads account to send data.
Always link Google Search Console (GSC). Linking the tool pulls data into a pertinent report (which you must first publish) via the Reports Library. The report should already be there and needs to be published. Pulling Google Search Console data in GA provides valuable additional information. While GSC does not import all dimensions and metrics, search impressions are, and they matter.
#3. Data Protection
It is a company's responsibility to ensure that any data collection occurs in compliance with GDPR (or any other relevant legislation, depending on your company's location and web traffic).
For an optimal Google Analytics setup, you must be mindful of several settings and areas to ensure it is GDPR-compliant.
We drill down on:
PII
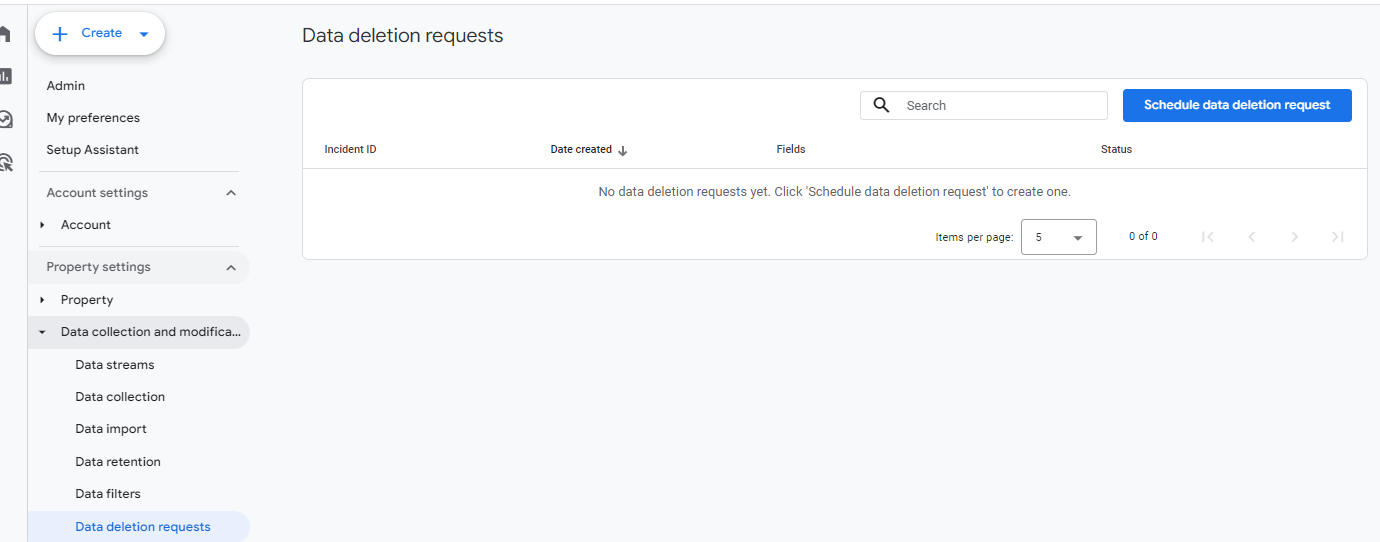
Personally identifiable information (or PII) is a term used to describe any information found in your database that can potentially identify an individual. In the world of GDPR and data privacy, it is vital to locate, delete and prevent the collection of PII to ensure we comply with data protection legislation.
It's possible to find PII in several places, but more commonly, we've discovered emails in the 'page path + query string' reports. Another place worth checking for PII is the Events report. Does your contact form collect and send user inputs in the URL to GA? This aspect is essential as Google reserves the right to delete your entire account if it finds PII in one of the properties or views.
If you find PII instances in your data, don't panic. First, identify the source of the personal data and prevent its collection in GA. If fixing it requires a lot of development or your developers have too much going on, there is a neat way of doing this via Google Tag Manager. Then, you can submit data deletion requests via the GA user interface to remove any sensitive data you have collected.
If you're not confident of doing this yourself, get in touch.
Data Collection settings
In the 'Data Collection' tab, Google turns on several settings by default, which may be an issue from a GDPR-compliance perspective.
Historically, Google Signals has been an issue from a GDPR standpoint as it collects user data based on your Chrome or Android device login, potentially making users personally identifiable. However, with Google's shift to Consent Mode V2, the scope of this setting has since changed, plus Google Signals has been removed from any data modelling via the reporting identity. While it is likely GDPR-compliant now, checking with your legal team to ensure this is true is always worthwhile.
'Granular location and device data collection' should be turned on. This setting collects city-level location and details about the user's device type. If not turned on, all traffic will be listed as coming from desktop devices or will not be available at all.
However, both 'Ads personalisation' and 'User provided data capabilities' are potentially non-GDPR compliant settings and will be turned on by default. We recommend deactivating these in all regions unless your legal team advises otherwise. While these settings should be ok to use if you have correctly implemented Google Consent Mode, you should probably get approval from your legal team.
Consent
Under GDPR legislation, users must consent to processing their data. We see this on websites through the use of consent banners. But does this mean that those consent banners are doing their job?
By law, tracking in the UK and EEA is supposed to only occur after a positive opt-in. Website owners must provide a breakdown of data usage, why it is used, for what purpose, and any third parties you share data with. Users should be able to withdraw consent at any time easily and shouldn't have to consent to be able to use a service if possible. Consent settings should also not be pre-ticked on the consent banner.
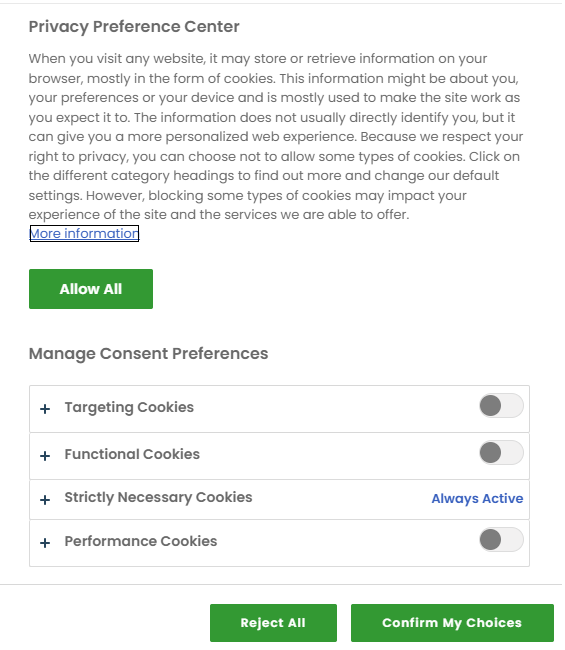
With this in mind, it's time to review your website to ensure the consent banner has all the information and functionalities required to comply.
- Are tags firing before user consent?
- If users opt-in solely for functional tracking, marketing, etc., will the events firing change accordingly?
- Are your tags configured correctly based on the tracking type (Facebook tags are set as marketing, and GA events are used for analytics)?
- Finally, Google requires you to use a certified consent management platform (CMP) for your cookie banner. Is your banner through one of these providers?
To check if the configuration is correct, you'll start by debugging your site through Tag Manager. When reviewing page-level insights, a tab should show the default consent settings. We recommend denying everything bar security_storage by default and granting only selected permissions upon 'On-page Update'.
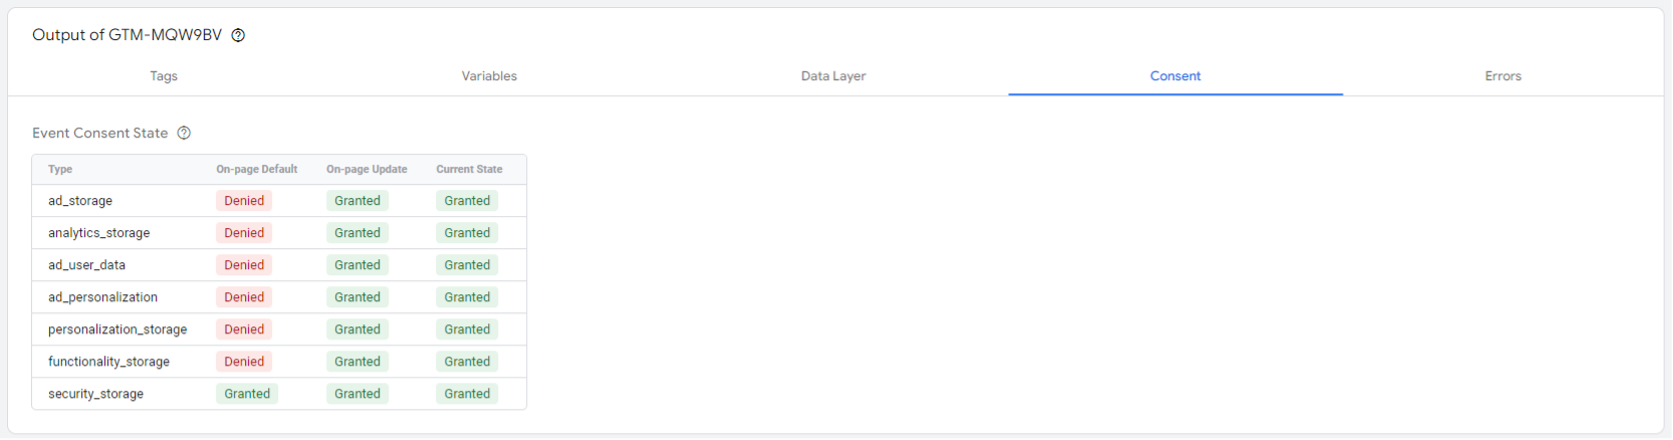
In GA, you'll also want to check that the 'Consent Settings' dropdown in the data stream indicates that the ad personalisation and measurement consent signals are active.
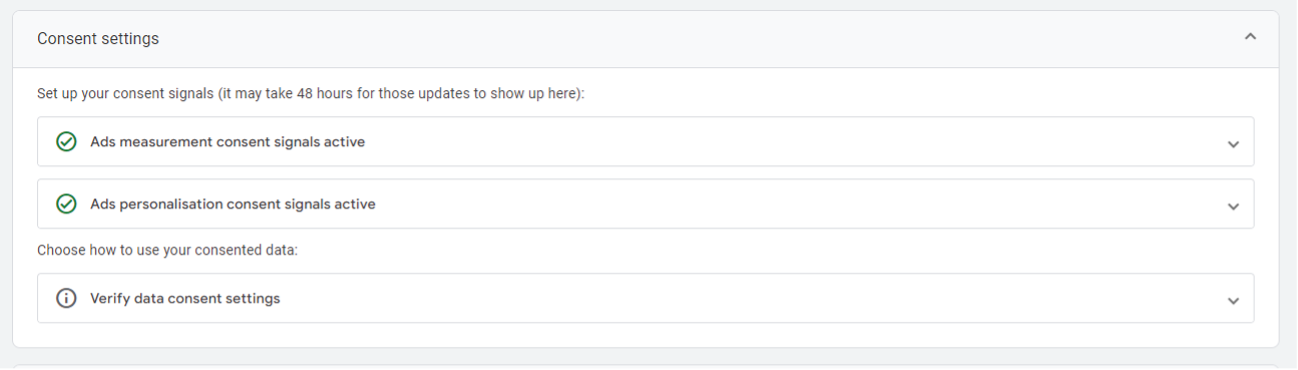
There are more thorough checks to run, such as looking at the GCS and GCD parameters populated in the data layer, but this is where unpicking your consent settings can get a bit more complicated. You will find additional help in this helpful blog from Simo Ahava, or if you're unsure, get in touch!
#4. Data Quality
The next check covers areas that may cause or indicate limitations in the quality of your data. Remember also to sense-check the data!
Data limits, sampling and thresholding
While powerful, Google's servers can only process so much information daily. For website teams, as the number of users and events increases, you may encounter issues with accurately recording and reporting the data. While in most cases, we're talking about issues, such as whether there should be daily event counts in the millions, it's good to keep an eye out for the total users and events on-site. Do they look plausible? Are there a lot of 'Other' events? Are there areas where too many unique values are being populated?
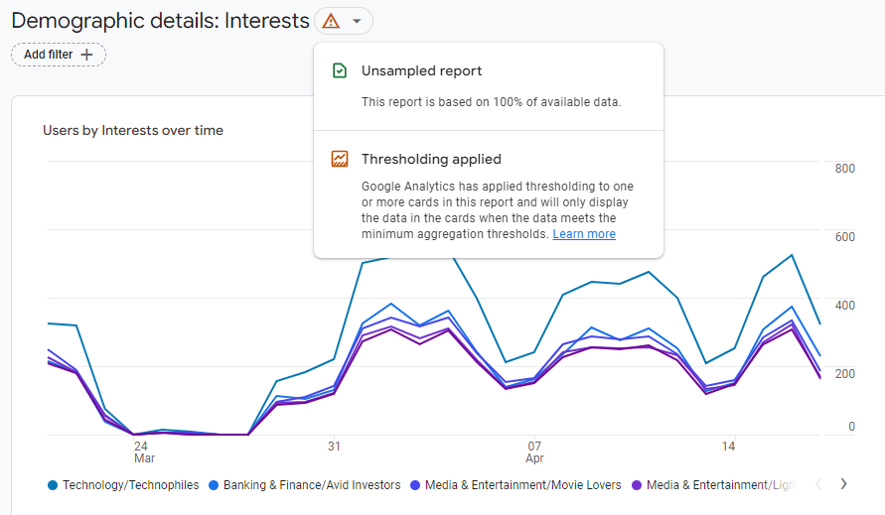
Next, we’ll have a look at the reports in GA. We’re looking for two problem areas: sampling and thresholding:
- Sampling: This shows up as an orange exclamation mark above the report and indicates that the volume of data for this report is too large for Google to pull, so you will receive a percentage of your data to examine instead.
- Thresholding is the opposite of sampling. The sample size is small enough to risk personally identifying users. This issue commonly occurs when the 'reporting identity' settings are set to 'blended'. It also shows up as an exclamation mark above the report.
Channel observations
When looking at attribution, we seek to understand different elements, including:
- Do the volumes from different channels look accurate?
- What are the most significant sources? Is there a lot of direct traffic to the site?
- What is the % share of direct traffic and direct revenue?
- Does direct traffic landing on campaign landing pages suggest a misattribution issue?
- Are direct sessions landing on the basket page and converting?
Is the latter more likely an untagged basket or an abandoned email effort?
When GA isn't sure of the source, direct traffic is the de facto bucket for all sessions. It assumes the user came directly to the site. While this is perfectly feasible for your homepage, are there any longtail URLs that are unlikely for someone to manually type in to get to your website?
Other questions you might consider at this point include:
- Does the referral channel contain traffic from search engines or email servers?
- How about social media platforms?
- And what about the 'Unassigned' channel? What percentage of traffic ends up in this channel, and what sort of traffic ends up here? Should it be sorted into different channels?
In most cases, the solution to resolving the prior questions is to set up custom channel groupings, which allow you to manually define which source/medium combination should be reported in which channel. You can also create custom channels that match your marketing activities.
Unwanted hostnames
If you look at the number of sessions by hostname, what hostnames are showing up? The hostname report should only contain your domains and subdomains.
If unwanted hostnames are showing up in your reports, set up a variable in GTM to exclude hostnames that do not match your domains.
Bot/Spam traffic
Unfortunately, there's no obvious place to look for bot/spam traffic in GA. This check requires a bit of digging. A key question to ask when looking through your reports include:
- Are there sources of traffic with high event counts and low/no engagement times that result in huge jumps in traffic?
It's also a good idea to look at questionable referral sources and sessions with repeated events.
💡 Top tip!
The tell-tale sign of bot traffic is a traffic source (or device category, screen resolution, browser version) with a bounce rate near 100% and an average time on a page of <1s.
Setting up custom alerts and insights is worthwhile because they will alert you when questionable activity is happening on your website.
#5. KPIs
We're nearly there! In this penultimate section, we examine whether you are tracking all of the vital user interactions (or key performance indicators) we expect to see when you analyse traffic on your website.
Read our measurement framework guide if you need clarification on the most important data points.
These include:
Conversion tracking
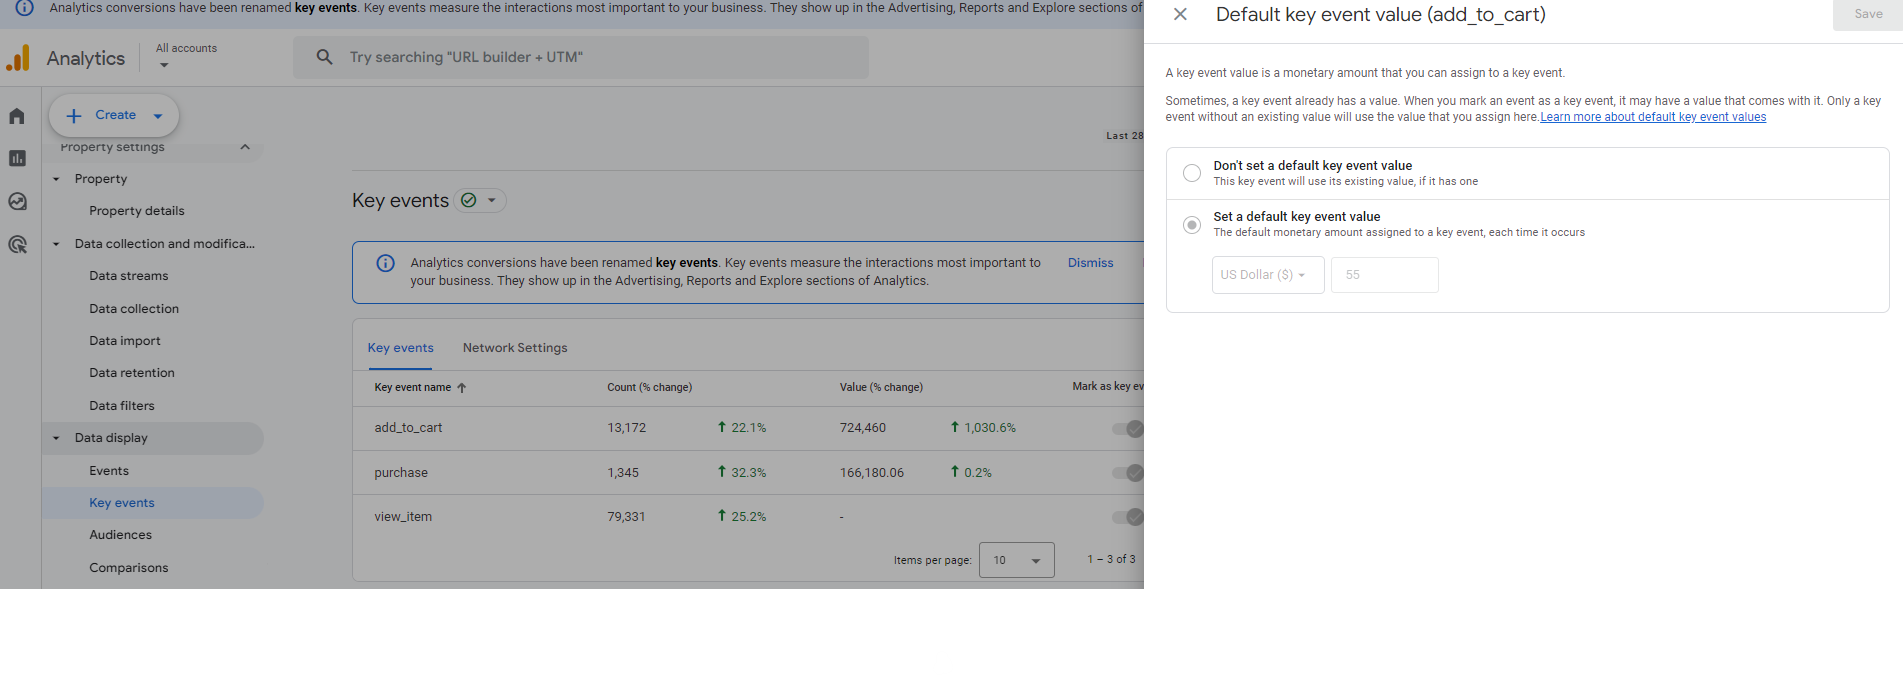
The first point is that conversions are now labelled as 'Key Events' in GA but are still called conversions in your advertising platforms. These are the actions you want users to take on your website, such as donating, submitting forms, or making purchases. Have you set up your primary events in GA and marked them as such?
Regularly check your key conversions against other data sources to verify the accuracy of your conversion tracking. Whether you are a charity tracking donations or a business that generates leads to later convert offline, you will likely have conversion data available from another platform, so use it to verify the accuracy of your data in GA.
Conversion values
Your key events can be assigned values, helping with E-commerce tracking. For example, if your website has a standard annual membership fee of £99, the primary event 'subscribe' could be assigned a value of 99.00. It's a small but useful feature to leverage to pull more information into your GA reports.
Conversion values also can't be triggered automatically. This means that in an organisation that receives monthly donations, the difference between the figures for your GA property and your actual revenue can be very different. Is it more meaningful to set up the average lifetime value of regular monthly donations (i.e. an individual donates on average for eight months in your organisation, so the conversion value is set to the average donation value multiplied by 8)?
Event tracking
Looking over the list of events in Google Analytics, are all the key events you want to track set up in GA? This list doesn't have to be an exhaustive setup if that's not necessary for your website, but it's good to have a clear view of what data points are helpful to your business and ensure these are all set up. You'll find more information in this blog post.
Outside of this, do event numbers look reasonable? Have there been any spikes or dips? Are there any events in Google Analytics that do not have corresponding tags in GTM or vice versa? GA allows you to create or modify events within the interface; being aware of where events originate from is critical to understanding whether or not you can trust them.
Check for created or modified events and document your findings. Document all other events in the 'Custom Data' tab of the health check document, thus documenting what is in place.
If you have many events and/or GTM tags, we can automate this.
E-Commerce tracking
There are several hugely helpful E-commerce reports in Google Analytics, but your event tracking needs to be in good order to benefit from them. You will find these reports in the 'Monetisation' tab in the standard reports, including checkout funnels, a breakdown of items purchased, and much more. Is information populating all of these reports? If not, we recommend setting up E-commerce tracking onsite.
Many of these reports may not be relevant for websites selling services rather than products or charities facilitating donations. However, not utilising these tracking options means missing out on some essential information about how your users interact with your website.
For example, how many users visit your services, and what are the crucial drop-off points in the registration process?
![]()
You should also periodically verify the data in Analytics against real sales data to determine how accurate it is when compared to what is happening. To complete the exercise, take a random week's sales data by date and transaction ID and compare it against what you have in GA.
What is an acceptable discrepancy between GA transactions, revenue and your sales data?
Well, this depends on several things. We expect a discrepancy of around 5%—10 % due to some users deploying ad blockers. If your cookie banner is compliant, but you have yet to implement the advanced consent mode functionality, your discrepancy between GA and your sales data could be as much as 50%.
Advanced consent mode models the available data to fill in the gaps, including sales, which should bring you closer to the 5-10% discrepancy again.
#6. Advanced Tracking
The last check is for advanced tracking. This check is more of a litmus test of your tracking setup's maturity and highlights additional features that may not be used.
In this section:
UserID
Is the UserID functionality in use? This feature allows you to track and identify users more accurately by assigning them an anonymous userID when they self-identify by logging into your website. It enables users to be recognised across visits, browsers, and devices, providing more accurate user data.
This feature is only worth exploring if users log in to use your website. Think of e-commerce, gaming websites, or other subscription or membership services.
The reporting identity will need to be set to blended or observed data. We recommend observed data in general, as blended data can result in data thresholding.

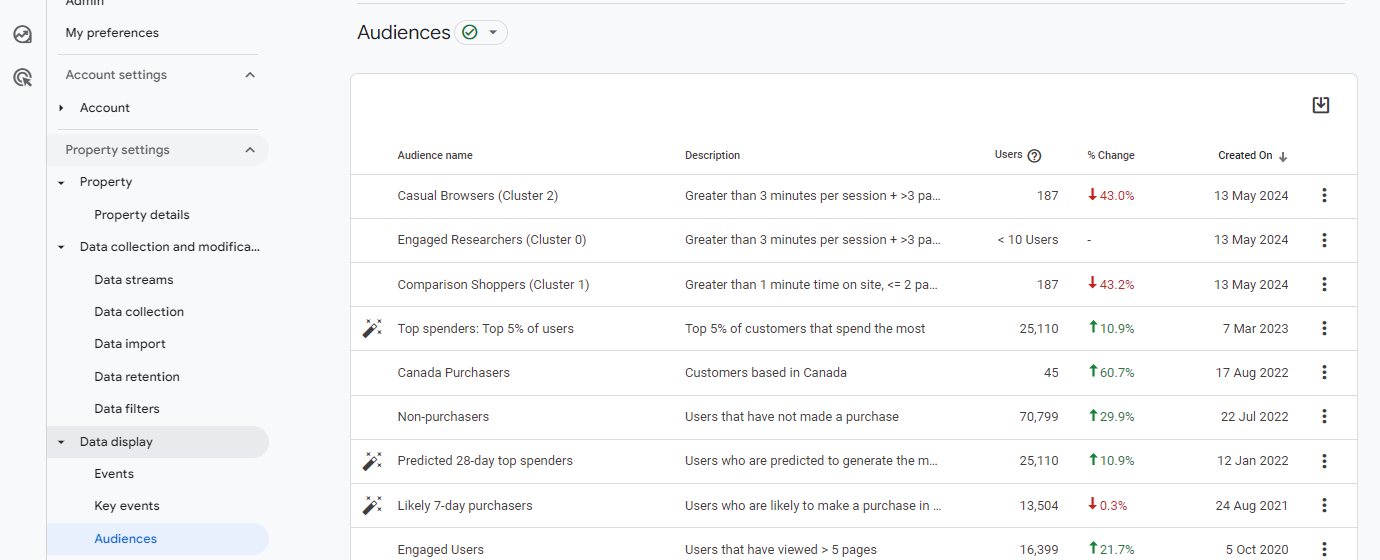
Audiences
You can create custom audiences in the 'Data display' section in GA. This feature helps segment users in your reports based on relevant criteria: for example, users who submit a 'Contact Us' form will appear in the 'prospective clients' audience.
Google also provides a set of prebuilt audiences, which may help users become more familiar with this feature.
You can export GA audiences to Google Ads for targeted advertising messaging. When used strategically, this is one of the most powerful and underused features of Google Analytics. For example,
Think of a user who viewed a specific product on your site but found that the size they were looking for was not in stock. You could now re-target that user with the very product they were looking at once it is back in stock. This is just an example.
Custom reports
Are you using the 'Explorations' tab in Google Analytics to create custom reports? These are particularly useful when there are recurring data points you may need to review that aren't easily accessible within the main Analytics reports, or if you have more complex queries in your data that require a review of several different fields. You can keep these as personal explore reports or make them viewable for anyone accessing your GA property.
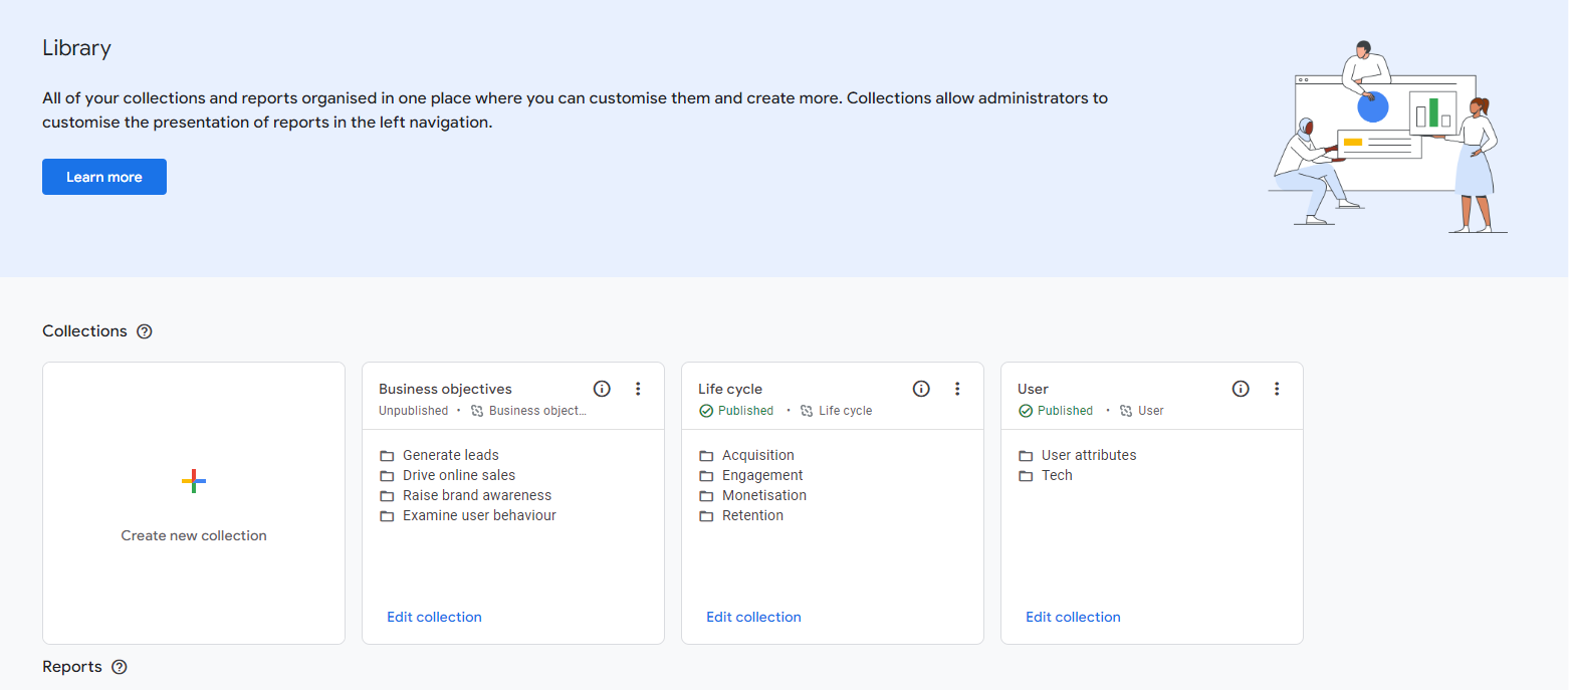
Customised navigation
By default, GA is populated with standard navigation on the left-hand side. Depending on which boxes were ticked during the initial GA setup, the navigation may contain a confusing set of report sections and duplication within them. It can get rather messy.
The great news is that all of this can be customised. You can remove irrelevant reports, such as app purchases and AdSense revenue, while all other reports and sections can be renamed, re-shuffled, and new ones created.
All of this customisation happens in the 'Library'. During a health check, we assess the changes made to the navigation and recommend ways to improve it.
Description automatically generated
Customised reporting interface
Similar to customised navigation, you can customise each existing report page. Remove widgets that show no data because they are irrelevant to your business, and replace them with the things that matter to you and your colleagues. You can create custom reports, such as funnel reports, in the Explore section of GA and then pull them through to become standard reports in the Reports interface. This check is great for determining whether you are making the interface work harder for you and flagging any missed opportunities.
Summary - what to do now?
There are many ways to assess the data integrity of a Google Analytics property; this is how we do it. With many confusing and, at times, contradicting settings in GA, we feel that it is critical to review each one to gain an accurate picture of how this data is being collected, manipulated, and then reported.
Following the template strictly will create a solid documentation snapshot of what is in place. We cannot emphasise enough how vital your tracking documentation is with GA.
Google Analytics data model is much more flexible. It can be customised to fit your organisation exactly. However, documenting that customisation is essential so anyone coming to the account can find their feet quickly and avoid misinterpretation.
All that's left is to get checking! If you have any questions or want to know more about health checks or our analytics services, message us or call us on 01903 285900.


Google Analytics audit
With a Google Analytics audit, we can help to ensure your data is accurate and that you’re measuring the right metrics for your KPIs.
Do you have a challenge we can help with?
Let's have a chat about it! Call us on 01903 337 580